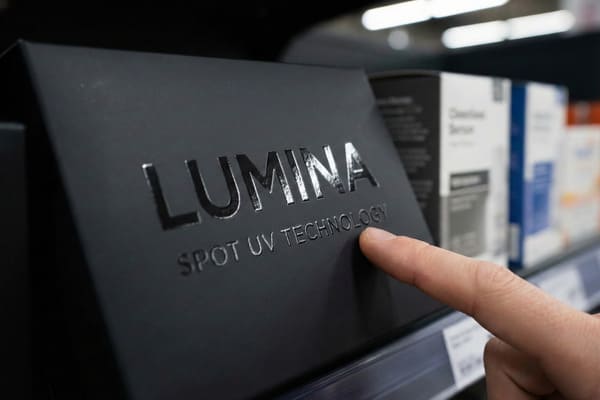
A flat, boring box kills retail sales. Spot UV fixes that by making your logo pop off the shelf. But getting it right on cardboard is harder than it looks.
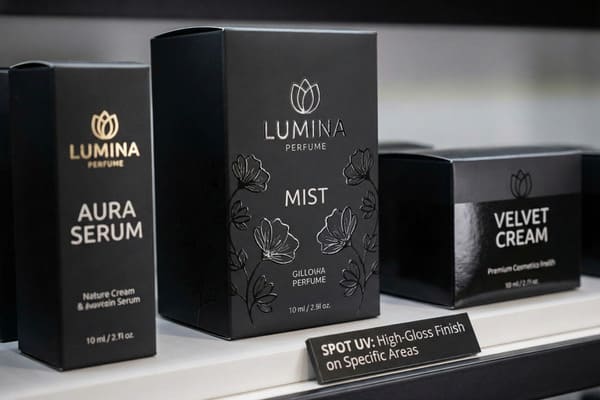
Spot UV (Ultraviolet) is a localized printing technique that applies a clear, glossy coating to specific areas of a matte surface, cured instantly by UV (Ultraviolet) light. This process creates a striking tactile contrast, highlighting logos or key text against the unvarnished background for premium packaging applications.
You've seen it on high-end tech boxes at Best Buy or luxury cosmetics at Sephora. That shiny, raised logo that catches the store lighting? That's spot UV. Let's break down how this actually works on the shop floor and why it makes shoppers stop and look.
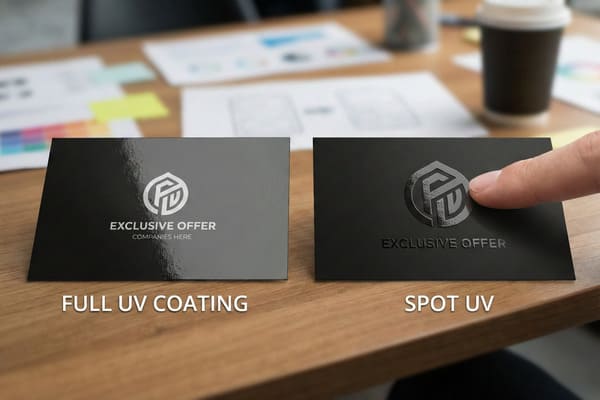
What is the difference between UV and spot UV?
Full UV coating covers the whole box, making it look like a cheap plastic toy. Spot UV targets only the parts you want to highlight.
The difference between UV (Ultraviolet) and spot UV (Ultraviolet) lies in the application area. Full UV coating covers the entire printed sheet for overall protection and gloss. Spot UV selectively applies the gloss varnish to specific design elements, creating a visual and physical contrast against a matte finish.
The Contrast Formula: Highlighting What Matters
I learned this the hard way. A client from New York insisted on flooding their entire pallet display with full UV coating. They thought making the whole thing shiny would grab attention at Costco. I told them it was a bad idea, but they wouldn't listen. It was a disaster. The displays arrived in a humid Florida warehouse, and because the full UV sealed the porous 32ECT B-Flute1 corrugated board completely, the trapped moisture caused the entire structure to warp and buckle. Plus, the intense overhead store lights created massive glare across the whole surface, making their UCC-128 shipping barcodes completely unscannable for the distribution center. We had to scrap 500 units.
Spot UV solves all of this by using precision. We use a Heidelberg Speedmaster2 press to lay down an Anti-Scuff Matte PP Lamination over the entire board first. This matte base absorbs overhead retail light and protects the structure while allowing the board to breathe. Then, we apply the clear gloss only to the brand name or hero product image.
Contrast is the real secret to retail sales. When a shopper walks down the aisle, the matte background stays dark, but the Spot UV logo literally flashes at them as they move past. This visual disruption drives impulse buying. By leaving the functional areas—like the barcode and the structural folding zones—completely matte, you ensure the display actually survives the supply chain.
| Feature | Full UV Coating | Spot UV |
|---|---|---|
| Application Area | 100% of the printed sheet | Targeted specific elements only |
| Visual Effect | High overall glare, looks cheaper | Premium contrast, highly tactile3 |
| Barcode Scanning | High risk of laser bounce/failure | 100% safe (kept matte) |
| Corrugated Risk | Traps moisture, causes board warping4 | Allows board to breathe naturally |
Clients hate hearing this, but paying for full gloss is a waste of money that ruins your barcode scans and weakens your display. I always push for targeted gloss over a scratch-resistant matte base. It looks a hundred times more premium. Ask me for the footage of our warehouse scanner failing on full gloss.
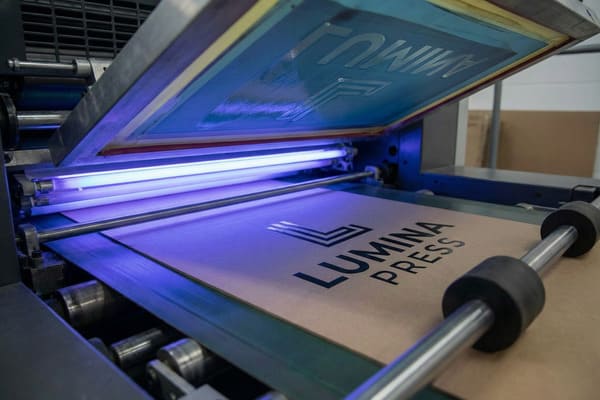
How does spot UV work?
It's not just wet ink. We use high-intensity light to instantly freeze liquid plastic onto the cardboard. It is fast, brutal, and highly technical.
Spot UV (Ultraviolet) works by screen-printing a liquid polymer varnish onto specific printed areas. Immediately after application, the substrate passes under high-intensity UV (Ultraviolet) lamps. The ultraviolet light triggers a photochemical reaction, instantly curing the liquid into a hard, raised, and glossy finish.
The Physics of Instant Curing on Corrugated Board
Printing this stuff on a flat sheet of thin paper is easy. Doing it on thick, wavy corrugated cardboard? A nightmare. Early on, we tried using standard litho-plates for a batch of display headers heading to Chicago. The heavy paper stretched slightly during the run. The result was terrible. The shiny gloss "drifted" about 1/16 of an inch (1.5 mm) off the printed logos. It looked like a cheap, blurry misprint, and it drove me crazy.
We completely overhauled our process. Now, we use High-Viscosity Screen Printing5 with a strict 0.5mm "Trapping" allowance. We essentially bleed the liquid varnish just a tiny bit over the edge of the printed ink. Even if the heavy 44# High-Performance Kraft linerboard shifts slightly in the machine, the gloss covers the logo perfectly without missing the edges.
The curing physics are intense. The printed boards roll under UV lamps hitting temperatures around 180°F (82°C) for a fraction of a second. The liquid polymer instantly polymerizes. This speed is critical. Because it cures instantly, the liquid doesn't have time to soak into the porous paper fibers. This is exactly how we achieve that high "raise" or premium tactile feel. If the varnish dried naturally over time, it would just sink into the board, leaving a dull mark that looks like a wet grease stain.
| Curing Stage | Technical Action | Machine Component | Potential Failure Risk |
|---|---|---|---|
| Preparation | Applying matte base lamination | Laminator | Poor adhesion if board is dusty6 |
| Application | Pushing liquid polymer through mesh | Screen Printer | Varnish drifting off the printed logo |
| Exposure | Hitting polymer with UV wavelengths | UV Lamp System | Under-curing leaves varnish sticky7 |
| Hardening | Instant photopolymerization | Cooling Rollers | Brittle cracking if applied too thick |
Getting the registration tight on corrugated board took a lot of trial and error until we perfected our screen-printing trap method. You don't want your premium logo looking like a blurry double-vision mistake. I can show you a video of our screens aligning perfectly on the press to prove it.
What is the difference between spot UV and blind UV?
Want to be subtle? Blind UV is the stealth wealth of packaging. It uses the exact same chemistry but plays a completely different psychological game.
The difference between spot UV (Ultraviolet) and blind UV (Ultraviolet) is the underlying print. Spot UV is applied directly over printed ink, such as a colored logo, to enhance it. Blind UV is applied over unprinted, blank areas of the substrate, creating a subtle watermark-like pattern.
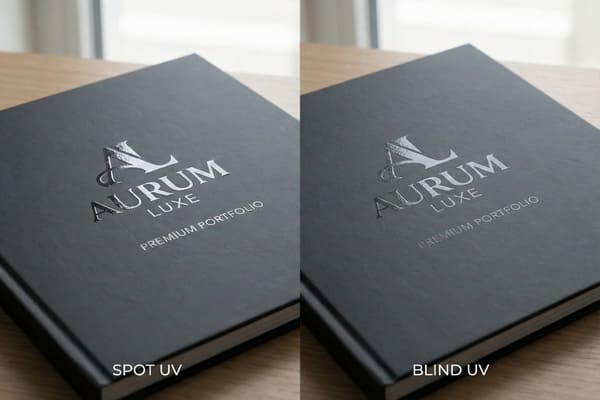
The Stealth Wealth Strategy in Retail Design
A luxury cosmetics brand once asked us to build an endcap covered in dark black ink, gold foil, and massive spot UV logos. It was a chaotic, visually noisy mess that looked like a cheap Halloween decoration. Shoppers in the test stores completely ignored it.
I told them to strip it all back. We switched the entire structure to an Anti-Scuff Matte Black finish. Then, instead of printing their secondary geometric brand pattern in dark gray ink, we used Blind UV8. We laid the clear gloss directly over the solid black, unprinted background.
Here is how this actually works on the shop floor. When a customer walks past the display, the matte black looks solid and monolithic. But as they take a step, the overhead store lights hit the clear Blind UV pattern. The hidden shapes suddenly reflect light, creating a dynamic, premium "watermark" effect. It pulls the shopper in and makes them want to physically touch the cardboard.
Technically, Blind UV is unforgiving. It requires a perfectly smooth surface. If you try this on standard wavy B-Flute, you get the dreaded Washboard Effect. The clear gloss just highlights the ugly ripples in the cardboard. For Blind UV to work, we strictly upgrade the job to a micro E-Flute or use a Litho-Lam on SBS9 (Solid Bleached Sulfate) base. The substrate must be flat as glass so the clear gloss catches the light sharply.
| Feature | Spot UV | Blind UV |
|---|---|---|
| Underlying Layer | Printed colored ink (e.g., CMYK logo) | Solid color or blank, unprinted substrate |
| Visual Goal | Make a specific element punchy and loud | Create a subtle, interactive watermark effect10 |
| Substrate Requirement | Standard corrugated works fine | Requires ultra-smooth E-Flute or SBS board11 |
| Shopper Psychology | Grabs attention from 10 feet (3 m) away | Encourages physical touch up close |
I always tell my high-end clients that less is more in retail. Slapping shiny gloss over every color looks cheap. Using blind gloss over a dark, scuff-resistant matte board makes the shopper curious. When they step closer to touch the display, they usually end up buying the product.
What is spot UV on a business card?
It's the classic introduction to premium printing. But the physics of a tiny card are exactly what we scale up to massive retail displays.
Spot UV (Ultraviolet) on a business card is a localized gloss varnish applied to specific elements like a company logo. This technique adds a premium, raised texture to heavy cardstock, typically 16 pt (0.4 mm) thick, significantly increasing the tactile appeal during professional networking exchanges.
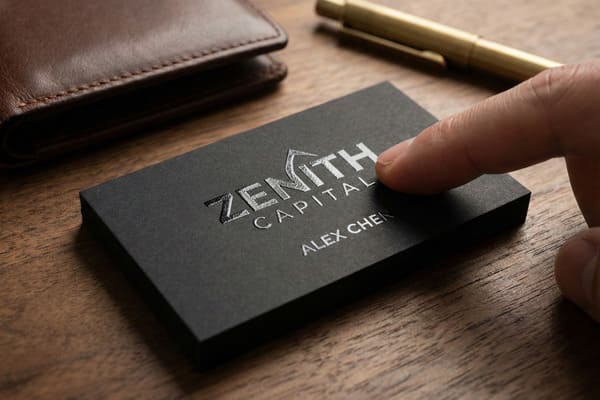
Scaling the Premium Tactile Experience
Everyone has felt a cheap, flimsy business card where the gloss flakes off the edges. I had a buyer bring me their fancy business card and say, "Make my 5-foot (152 cm) tall dump bin display look exactly like this." But translating a 3-inch (7.6 cm) card onto a massive 48×40 inch (121×101 cm) structural retail unit is an engineering nightmare.
The core problem is paper tension and movement. A thick business card is a single, dense sheet of paper. When you apply UV gloss, it sits perfectly flat. But a retail display uses layered corrugated board that has to be folded into a 3D shape. If you apply a heavy layer of raised Spot UV across a large folding crease, the dried polymer acts like a sheet of ice. When the store employee at Target folds the cardboard to assemble the base, that hard gloss will crack, splinter, and shatter right off the score line.
To fix this, we map out the dieline with absolute precision. We program our prepress software, using Adobe Illustrator linked with ArtiosCAD, to create a strict "Gloss Keep-Out Zone12." We ensure the Spot UV13 stops exactly 1/8 inch (3 mm) before any structural score line or raw cut edge. This gives the brand the exact same luxury tactile feel they love on their corporate business card, but engineered to survive the brutal assembly process of a real-world distribution center.
| Attribute | Business Card Spot UV | Corrugated Display Spot UV |
|---|---|---|
| Substrate Type | Single-ply solid cardstock (e.g., 300gsm) | Multi-layered corrugated board (e.g., 32ECT) |
| Structural Folds | Rarely folded, stays flat | Heavily folded, high tension on corners |
| Polymer Cracking Risk14 | Very low | Extremely high if applied over score lines |
| Prepress Requirement | Standard masking | Strict "Keep-Out Zones" using ArtiosCAD15 |
You cannot just take commercial printing tricks and slap them onto structural packaging without doing the math. Corrugated board bends, warps, and takes a beating in transit. We engineer the gloss to stay exactly where it belongs—on your logo, not flaking off onto the retail floor.
Conclusion
Spot UV transforms flat cardboard into a tactile, premium experience that commands attention in crowded aisles. Ready to upgrade your retail presence? Contact us to get a Free Physical White Sample today.
Learn why 32ECT B-Flute is crucial for packaging strength and how it impacts the durability and performance of retail displays. ↩
Discover how the Heidelberg Speedmaster enhances print quality and efficiency, making it a top choice for professional packaging solutions. ↩
Learn how premium contrast and tactile effects in Spot UV printing can enhance your product's visual appeal and customer experience. ↩
Understand the risks of moisture trapping and board warping with full UV coating to make informed packaging decisions and avoid costly issues. ↩
Learn how High-Viscosity Screen Printing enhances print quality on challenging surfaces like corrugated board, ensuring sharp, premium results. ↩
Learn how to ensure strong lamination adhesion by addressing dust issues, which can significantly improve product quality and reduce defects. ↩
Discover the main reasons for sticky varnish after UV curing and how to resolve them for a flawless, durable finish on your products. ↩
Learn how Blind UV creates a premium, interactive effect in retail displays, elevating brand perception and shopper engagement. ↩
Discover why Litho-Lam on SBS is essential for flawless finishes in luxury retail displays, ensuring a smooth, high-quality appearance. ↩
Discover how Blind UV printing produces a unique interactive watermark effect, enhancing tactile engagement and elevating packaging design. ↩
Learn why ultra-smooth E-Flute or SBS board is essential for achieving the best results with Blind UV printing and how it impacts the final product quality. ↩
Discover how a Gloss Keep-Out Zone prevents gloss cracking on folds, ensuring premium finishes survive real-world handling and assembly. ↩
Learn how Spot UV enhances packaging with a luxury tactile feel and why its application is critical for both aesthetics and durability. ↩
Understanding polymer cracking risk is crucial for ensuring the durability and quality of printed materials, especially when using Spot UV on complex substrates. ↩
Learning to set up strict keep-out zones in ArtiosCAD helps prevent finishing defects and ensures professional results in packaging and display production. ↩


