I meet brands that lose money because products arrive damaged. I feel the pain because I run a display factory and I count every return. I use packaging inserts to stop damage, cut waste, and keep deadlines.
Packaging inserts are protective structures placed inside a box to stop movement, absorb shock, and prevent surface damage during shipping; they are not instruction leaflets or manuals, and they can be made from corrugated, molded pulp, foam, paperboard, or honeycomb materials.
I will keep this simple and practical. I will show what inserts are, why we use them, how they fit into the four packaging levels, and how product inserts differ from leaflets. I will also explain how I choose materials when I build cardboard displays and protective sets for buyers with strict timelines.
What is a packaging insert?
I see a box fail when the product rattles. I fix that by adding a shaped piece inside the box. It holds the product in place and spreads impact loads.
A packaging insert is a shaped internal support that holds and protects the product inside a shipper or retail box; it limits motion, absorbs shocks, separates parts, and keeps surfaces clean and scratch-free.

How it protects in real life
I start with the failure mode. Heavy limbs on a crossbow can snap mounts. Glass lenses can scratch risers. Small hardware can dent printed trays. An insert adds a firm boundary between parts. It blocks point loads. It creates crush zones1 that take the hit first. In drop tests, I look for less than 10 mm of free play and even pressure on contact areas. I add finger holes for easy pack-out. I add locking tabs so the insert does not float. I mark load paths with a pen during testing to see where force travels. If I see white stress lines on corrugate, I add a score or a gusset. When I ship displays, I pair the insert with an outer brace. This keeps corners from collapsing in a stack. I keep the design flat-pack to cut freight volumes.
Common materials and where I use them
| Insert Type | Best For | Pros | Cons | Unit Cost | Recyclability |
|---|---|---|---|---|---|
| Die-cut corrugated (E/B/C flute)2 | Medium to heavy gear | Strong, low cost, custom shapes | Bulkier than foam | $ | Widely recyclable |
| Molded pulp3 | Consumer sets, multi-part kits | Good cushioning, eco look | Tooling lead time | $$ | Recyclable/compostable |
| Honeycomb board blocks | Very heavy items | High crush strength | Thick, less form-fit | $$ | Recyclable |
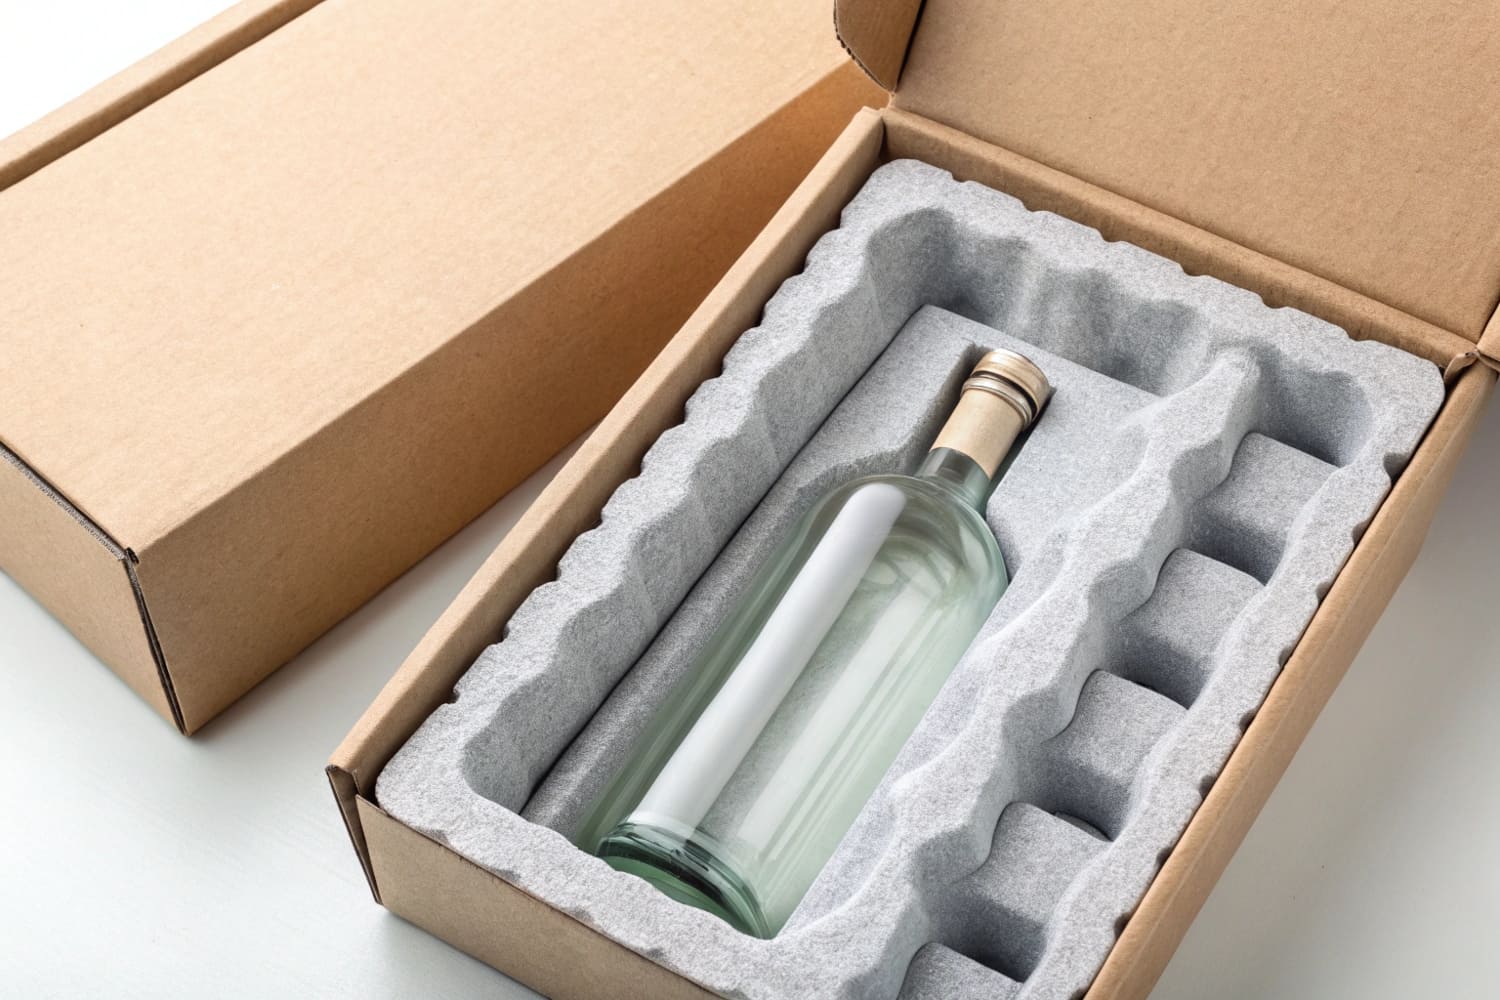
| Paperboard partitions | Bottles, small jars | Light, cheap | Low shock absorption | $ | Recyclable |
| PE/EVA foam (as last resort) | Precision parts | High cushion, clean fit | Sustainability4 concerns | $$–$$$ | Limited |
Design checklist I follow
— Fit: target <3 mm clearance on critical faces.
— Load: add crush space of at least 10–15 mm on drop sides.
— Assembly: under 30 seconds per set.
— Testing: ISTA-1A/3A style drops, plus vibration and clamp.
— Printing: minimal; marks for assembly steps only.
— Sustainability: fiber first; foam only when needed.
What are package inserts used for?
I use inserts to solve a list of simple but costly problems. I block parts from hitting each other. I guide the unboxing. I cut returns. I hit shelf dates.
Package inserts are used to immobilize products, isolate fragile parts, absorb impacts, prevent scuffs, speed pack-out, guide unboxing order, and pass drop and vibration tests so shipments arrive retail-ready.
Use cases, from factory floor to store shelf
I serve buyers who launch on a fixed date. Miss that date and we burn margin. Inserts keep the schedule safe. For hunting gear, I lock the bow, the scope, and bolts in separate pockets. I route the trigger guard away from glass. I place dense pads under mass points to share load into the corrugated grain. For countertop displays, I ship pre-packed trays with partitions so units do not scrape off ink. This stops color rub. For pallet displays, I add honeycomb posts inside master cartons to take clamp force from the sides. I label "open here" on the insert so the retail team can set up fast. I also design inserts that double as a setup jig. Staff lift the insert, flip, and the tray is ready. This saves minutes per store. That time is money when the rollout covers hundreds of locations. I track damage rate before and after. If damage drops under 1%, I lock the spec. If not, I tweak flute, add scores, or change pocket depth.
Quick matrix of goals and solutions
| Goal | Problem | Insert Solution | Test I Run |
|---|---|---|---|
| Reduce breakage | Drop shock | Add crush ribs, corner bumpers | 10-drop sequence |
| Stop abrasion | Surface rub | Soft liner or micro-flute skin | Rub test on print |
| Speed packing | Slow assembly | Auto-lock tabs, fewer parts | Time study |
| Guide unboxing | Confusing steps | Numbered pockets, arrows | Store pilot |
| Survive clamp | Side pressure | Honeycomb posts, braces | Clamp cycle |
What are the four main types of packaging?
People use this phrase a lot. It often causes mix-ups. I keep it clear and tie inserts to each level.
The four main packaging types are primary, secondary, tertiary, and protective/dunnage; inserts live mostly inside secondary and tertiary levels to hold products and resist shock during shipping and handling.
The four levels and how inserts fit
1) Primary
This is the pack that touches the product. A bottle. A pouch. A printed inner box. I rarely place big inserts here. I might add a thin sleeve or collar to stop a cap from moving. I avoid bulky parts that make opening hard.
2) Secondary
This groups units for retail. Think a printed carton with a display window. My inserts usually sit here and shape the hero view. For a crossbow kit, I hold each part in a die-cut cradle. I keep the look neat for the first open at a store or at home.
3) Tertiary
This is for shipping. A brown master carton. A tray that stacks on a pallet. I put block inserts and edge crush guards here. They take the clamp and drop hits. They also let me flat-pack displays and keep edges clean.
4) Protective/Dunnage
Some teams fold this into tertiary, but I call it out. This includes corner posts, sleeves, airbags, paper void fill, and honeycomb sheets. I choose fiber over plastic if the risk allows. I move up to foam only when tolerances demand it.
Mapping inserts to levels
| Level | Typical Insert | Role | Notes |
|---|---|---|---|
| Primary | Collar/sleeve | Micro restraint | Keep UX clean |
| Secondary | Die-cut corrugate or pulp5 | Form-fit cradle | Branded interior |
| Tertiary | Honeycomb blocks, edge guards6 | Load path control | Clamp-safe |
| Dunnage | Paper void fill, airbags | Void management | Fiber first |
What are product inserts?
I hear "product insert" and some people think about a leaflet. I draw a clear line so teams do not mix terms.
Product inserts are physical components placed with the product to protect and present it, such as corrugated cradles or pulp trays; they are not instruction leaflets or warranty cards.
Clear definition, examples, and pitfalls
A product insert7 carries the product, not the message. It keeps shape, sets spacing, and helps the reveal. A leaflet carries words. It tells the user what to do. I do not mix them. If I print steps, I print small icons on the insert only to guide pack-out or unboxing. For a retail display kit, my "product insert" is a die-cut cradle for the hero unit and a partition for accessories. For shipping, my "product insert" is a honeycomb block fixed with a slot. If a team asks me to add QR codes and long text on the insert, I push back. The extra ink can rub, and the message can date fast. I keep the insert structural and simple. I keep the leaflet loose or printed on the primary pack. This helps recycling too. The insert goes in paper recycling without mixed materials. The leaflet goes with it. When I must use foam for tight tolerances, I label parts for disassembly and advise end users to separate materials.
Quick comparison table
| Item | Purpose | Material | Recyclability | Where I place it |
|---|---|---|---|---|
| Product insert | Protect and position | Corrugate, pulp, honeycomb, foam | High (fiber) to low (foam) | Inside box, around product |
| Leaflet/manual | Inform and instruct | Paper | High | Loose in box or pocket |
Conclusion
Packaging inserts protect products by stopping movement, absorbing shock, and guiding pack-out. I keep designs simple, fiber-first, fast to assemble, and ready for real test conditions.
Understanding crush zones can enhance your packaging strategy, ensuring better protection for your products during shipping. ↩
Explore the advantages of die-cut corrugated packaging to optimize your product protection and cost efficiency. ↩
Discover how molded pulp can provide eco-friendly cushioning solutions for your products while maintaining quality. ↩
Learn about sustainable packaging practices that can reduce environmental impact and enhance your brand's reputation. ↩
Explore this link to understand how die-cut corrugate or pulp enhances packaging design and functionality. ↩
Discover the benefits of honeycomb blocks and edge guards in packaging to ensure product safety during shipping. ↩
Understanding product inserts can enhance your packaging design, ensuring functionality and sustainability. ↩


