Confused by the endless jargon in display catalogs? Picking the wrong structure for your retail channel kills your margin before the pallet even hits the floor.
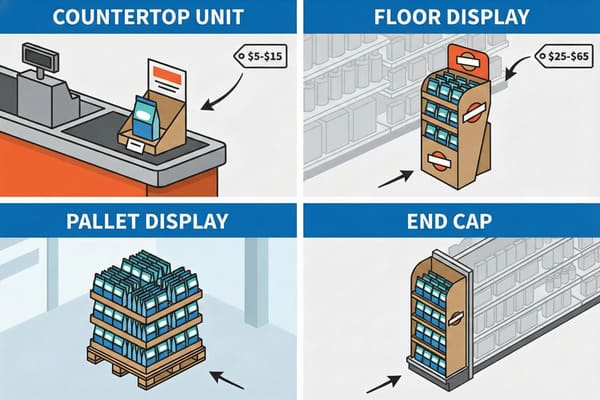
The types of POP displays and their cost ranges are categorized by their structural footprint and retail placement:
- Counter Displays (PDQ): $5–$15 (€4.50–€14) for compact checkout units.
- Floor Displays: $15–$50 (€14–€46) for standalone shelving.
- Pallet Displays: $25–$60+ (€23–€55) for large bulk merchandisers.
- Endcaps: Custom pricing, designed for high-visibility aisle ends.
But knowing the price tag is the easy part; the real profit killer is choosing a structure that defies the laws of retail physics.
What are the different types of display units?
Walk into a Walmart or Costco, and you see chaos. But to a factory owner like me, it's a strict hierarchy of structural engineering.
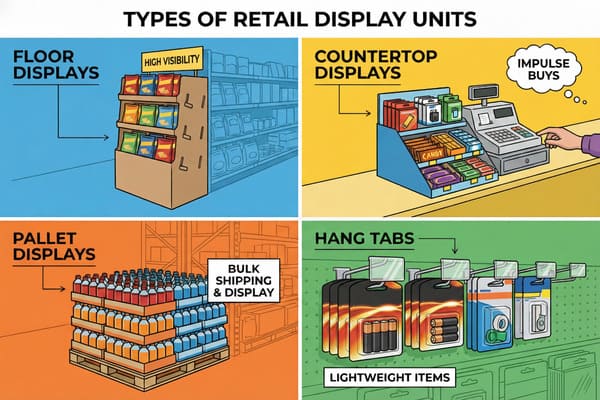
The different types of display units include temporary corrugated stands and semi-permanent fixtures designed for specific retail footprints:
- Floor Stands: Independent shelving units.
- Dump Bins: Open containers for loose items.
- Half-Pallet Displays: Large footprint bulk holders.
- Clip Strips: Vertical strips for hanging lightweight items.
The Structural Anatomy of Retail Merchandising
Choosing a display type is actually a physics problem, not an art project. I learned this the hard way years ago when a client insisted on a standard Floor Display1 for a heavy beverage launch. We built it, it looked great, but the moment the store janitor mopped the floor, water seeped into the raw cardboard base. The "Soggy Bottom" effect caused the whole tower to lean like the Tower of Pisa. It was a disaster. Now, I refuse to build a floor unit without applying a biodegradable water-resistant coating or a clear "mop guard" on the bottom 2 inches (5 cm).
Then you have Countertop Displays2 (often called PDQs). These look simple, but they are nightmare fuel for stability. If a shopper buys the front three items, the center of gravity shifts backward, and the display flips over. To fix this, I enforce a strict "2:3 Ratio" for depth versus height. If the client wants a tall header, I have to engineer a "False Bottom" with a hidden weighted corrugated pad to anchor it properly.
For the big players like Costco, we talk Pallet Displays3. These aren't just big boxes; they are industrial shipping containers that happen to be pretty. Costco demands "Shop-Through" capability—meaning you must be able to reach products from three sides. If I design a pallet with solid walls that creates "Dead Zones," the buyer rejects it immediately. And let's not forget Sidekicks4 (Power Wings). These hang off shelves using a metal bracket. I always argue for the "Universal Metal Bracket" because cheap cardboard hooks rip after two days of heavy traffic, leaving your brand on the dirty floor.
| Display Type | Best Use Case | Common Failure Point | Retailer Compliance |
|---|---|---|---|
| Floor Display | New product launches. | "Soggy Bottom" from mopping. | Moderate (Height limits apply). |
| Pallet Display | Bulk items, club stores. | Crushed corners in transit. | Strict (Must fit 48×40" pallet). |
| Counter PDQ | Impulse items, checkout. | Tipping backward when empty. | High (Cannot block sightlines). |
| Dump Bin | Loose items, discounts. | Bulging "pregnant" walls. | Moderate (Must withstand burst). |
I used to let clients pick whatever shape they thought looked cool. That was a mistake. Now, before I even open the CAD software, I ask "Is this going to a Club Store or a Grocery Store?" If it's Club, we prioritize stackability and crush strength using EB-Flute. If it's Grocery, we focus on footprint and mop guards.
How much does a pop-up usually cost?
You want a price, but the answer depends entirely on volume. A quote for 100 units looks terrifying compared to the unit price of a 5,000-unit run.
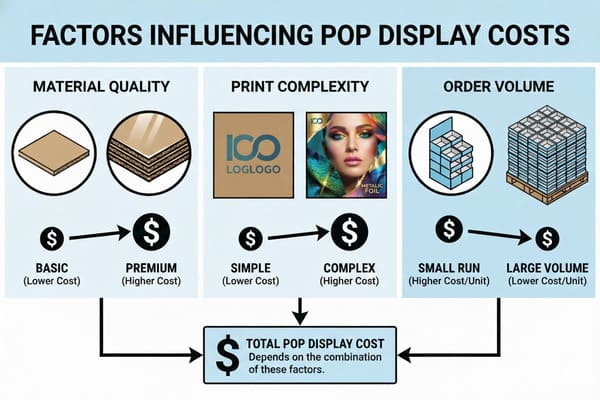
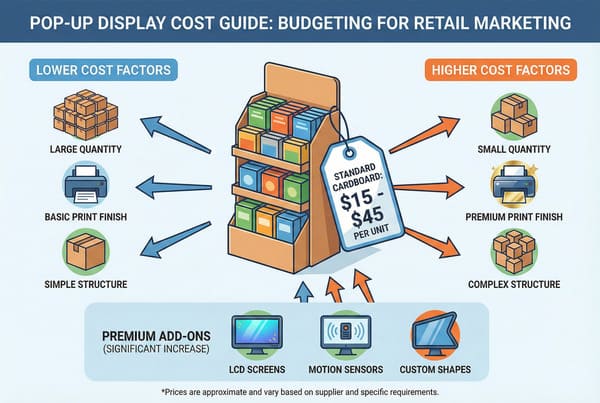
A pop-up usually costs between $15 and $50 (€14–€46) per unit, fluctuating based on total production volume and structural complexity. While simple counter trays can cost as little as $5 (€4.50), heavy-duty pallet displays often exceed $60 (€55) due to reinforced materials.
Strategic Cost Analysis: Volume vs. Complexity
Price is a sliding scale, and hidden factors kill your budget faster than the manufacturing cost. The biggest invisible cost is "Volumetric Weight." I once had a client design a beautiful curvy display that didn't fold flat. The manufacturing cost was $18 (€16.50), but because it packed inefficiently, they were shipping mostly air across the ocean. The freight cost hit $25 (€23) per unit. I had to intervene and redesign the header to be a bi-fold. That one tweak saved them thousands in shipping.
Then there is the "Small Run" trap. Western brands often want 200 units for a trial. In China, setting up a Lithographic5 printing press takes the same time for 200 sheets as it does for 10,000. That setup cost is massive. I treat a 200-unit order like a mass production run—using high-fidelity offset printing, not digital—but the amortization hurts. Using Litho for small runs means high setup costs are shared by few boxes. But if you increase to 500 units, the setup cost stays the same, and your unit price drops by 60%.
Material choice is another lever. Clients often try to cut costs by using Recycled Testliner for the structure. It's cheap, but it's made of short fibers. It cracks at the folds and bursts under humidity. I practice "Value Engineering6." Instead of downgrading the paper, I look at the design. I'll say, "If we merge these two glued parts into one smart fold, it looks 95% the same but saves 30% in manual labor." That's how you save money without your display looking like trash after a week.
| Cost Driver | Impact on Price | My "Shop Floor" Advice |
|---|---|---|
| Quantity | Massive | 500 units is the "Magic Number7" where offset printing becomes economical. |
| Material | Moderate | Never downgrade the structural liner; downgrade the internal fillers instead. |
| Labor | High | Minimize glued parts. Use "Origami-style" folds to reduce assembly time. |
| Freight | Hidden Killer | Optimize carton dimensions to fit exactly into a 40HQ container. |
Don't just look at the unit price on the invoice. A cheap display that is difficult to assemble will cost you triple in store labor, or worse, the store staff will just throw it away. I optimize for "Landed Cost" plus "Execution Speed," ensuring the total project is profitable, not just the cardboard box.
What are the different types of window displays?
A window is the store's eye. But designing for it requires understanding the architectural stage before you even think about the cardboard props.
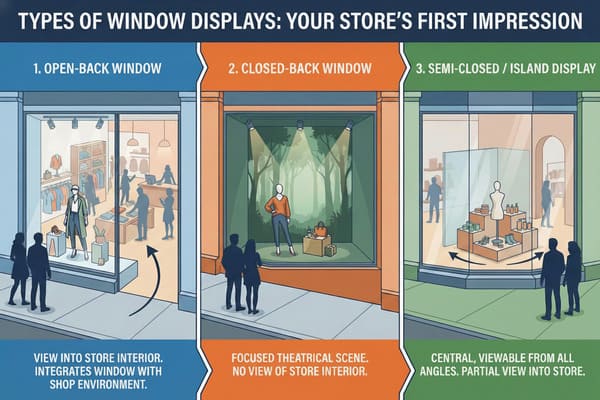
The different types of window displays include Closed Back, Open Back, Semi-Closed, Shadowbox, and Island layouts. These fixtures are categorized by their architectural structure, ranging from solid-walled boxes that isolate the product to transparent setups that allow passersby to view the store interior.
Architectural Context & The Cardboard Integration
When a client asks for "Window Props," my first question is always: "Is it an Open or Closed window?" This isn't just curiosity; it dictates the entire manufacturing process.
In a Closed Back window, you have a solid wall behind the display. This is the easiest scenario. I can use "Easel-Back" standees that are raw cardboard on the back because nobody sees the rear. It's cheap and effective. But the nightmare starts with Open Back8 windows. These allow shoppers to see into the store from the street. If I send that same Easel-Back standee, the customers inside the shop will see the ugly brown corrugated flutes and a taped-on support leg. It looks cheap. For Open Back windows, I have to use "Sandwich Printing9"—where we mount printed sheets on both sides of the cardboard core, hiding the flutes completely.
Then you have Island Displays, often found in mall entrances or large lobbies. These are viewable from 360 degrees. A standard "Pop-Up" won't work here because it has a "blind spot." I have to engineer a central column or a totem structure that looks perfect from every angle. I recall a project for a fashion brand that forgot this; they put a one-sided display in a mall island. Customers walking behind it just saw a white blank wall. We had to rush-ship "Back-Cladding" stickers to fix it.
Shadowbox windows are small, elevated, and intimate—common in jewelry or luxury cosmetics. Here, the focus is on "Print Fidelity10." Because the shopper is standing inches away from the glass, they see every imperfection. I can't use standard flexo printing here. It has to be high-resolution Litho with an "Anti-Scuff" matte finish to avoid glare from the window glass.
| Window Type | Description | My Manufacturing Constraint |
|---|---|---|
| Closed Back | Solid wall behind the glass. | Single-sided print is fine. Use cheap Easel supports. |
| Open Back | Viewable from street and store interior. | Must be Double-Sided Print. No raw edges visible. |
| Island | Standalone, viewable from 360°. | Structure must be a Totem/Column. No "back side." |
| Shadowbox | Small, elevated, close-up view. | Requires High-Res Litho11 print & Anti-Glare finish. |
Don't treat all windows the same. If you put a Closed-Back prop in an Open-Back window, you block the view of your store and show your customers ugly brown cardboard. Match the prop structure to the architectural reality.
What are retail pop displays?
It's not just a box; it's a silent salesman. A good POP display interrupts the shopper's autopilot mode and forces them to look.
Retail POP displays (Point of Purchase Displays) are temporary or semi-permanent marketing fixtures strategically placed to drive impulse sales. These units disrupt the standard shopping journey by isolating products from the shelf, significantly increasing brand visibility and product sell-through rates.

The Psychology of Visual Disruption12
Shoppers suffer from "Decision Fatigue." Walking down a standard aisle, they zone out. A POP display works because of "Visual Disruption." By isolating your product on a standalone unit, usually with curvy die-cut shapes that break the straight lines of metal shelving, we grab attention faster. I teach my clients the "3-Second Lift." A floor display typically increases sell-through by 400% compared to the home shelf because it simplifies the choice.
But getting them to look is only half the battle. They have to buy. I see so many designs where the product is hidden behind a high front lip. I enforce the "Chin-Up" Angled Shelf rule. We angle the bottom shelves upwards by 15 degrees. This makes the product "look up" at the customer, increasing label readability by 100% for someone standing 3 feet (1 meter) away.
We also have to deal with the "Silent Salesman" reality. Store staff won't explain your product. So, we integrate interaction directly into the structure. I'm not talking about a small QR code nobody scans. I mean a structural "Phone Shelf" or a massive QR target at eye level. We treat the QR code as a design element, not an afterthought. And for stability, especially with "Dump Bins" holding heavy items, I use an internal "H-Divider" or "Belly Band." I simulate the burst pressure in the factory with sandbags because a bin that looks "pregnant" and bulges out looks unprofessional.
| Mechanic | Impact on Shopper | Technical Execution |
|---|---|---|
| Visual Isolation | Stops "Autopilot" | Die-cut shapes that contrast with shelves. |
| Angled Shelves | Improves Readability | 15-degree upward tilt on lower tiers. |
| Smart Structure | Prevents "Messy" look | Internal H-Dividers to stop bulging. |
| Interaction | Drives Digital Traffic | Giant structural QR codes at eye level. |
Brands spend millions on TV ads but forget the "last inch" of the sale. A POP unit is that final nudge. If I design it right—with the right angle and the right structural integrity—the customer grabs the product before they even realize they wanted it.
Conclusion
The market is flooded with flimsy cardboard that hurts brand reputation. You need a partner who understands the physics of retail, not just the graphics. Whether it's a Free Structural 3D Rendering to prove the concept or a Physical White Sample to test the strength, I ensure your display survives the real world. Get a Free Quote today and let's build something that actually sells.
Explore this link to learn effective strategies for creating stable and attractive Floor Displays that enhance product visibility. ↩
Discover expert tips on maintaining stability in Countertop Displays, crucial for preventing accidents and maximizing sales. ↩
Find out the essential design requirements for Pallet Displays to ensure compliance and functionality in retail settings. ↩
Learn about the benefits of Sidekicks in merchandising, including how they can enhance product accessibility and visibility. ↩
Explore the benefits of Lithographic printing to make informed decisions for your production runs. ↩
Learn about Value Engineering to enhance product design and reduce costs without sacrificing quality. ↩
Discover why 500 units is considered the Magic Number for cost-effective offset printing. ↩
Explore this link to learn effective strategies for creating visually appealing Open Back displays that attract customers. ↩
Discover the details of Sandwich Printing and how it enhances the quality of displays, ensuring a professional look. ↩
Understanding Print Fidelity is crucial for creating high-quality displays, especially in luxury retail environments. ↩
Learn about the advantages of High-Res Litho printing and how it can elevate your display's visual impact. ↩
Understanding Visual Disruption can enhance your marketing strategies, making your displays more effective and engaging. ↩


