You have likely spent months perfecting the structural design of your new product packaging, only to feel frustrated when the printed result looks blurry or pixelated. This common issue often stems from using the wrong file format during the design phase, which can delay your launch and hurt your brand image in retail environments.
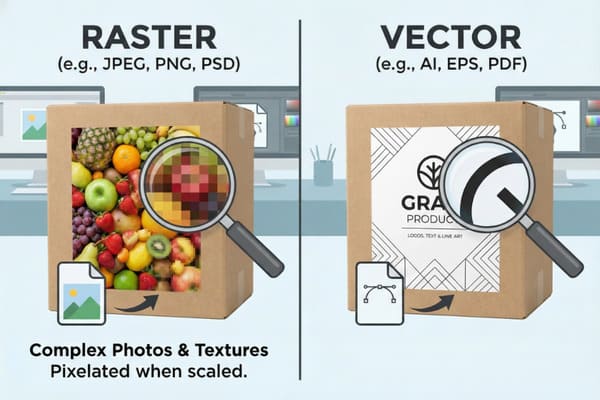
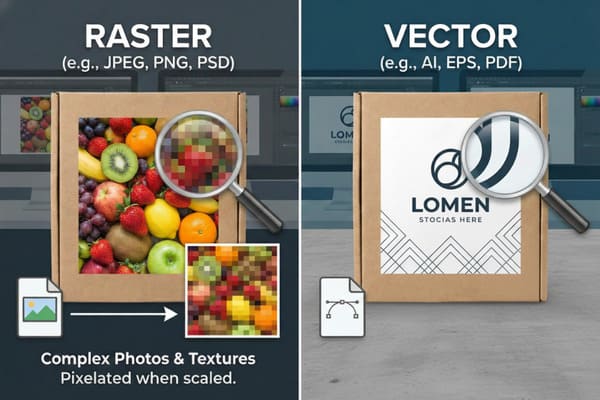
The choice between raster and vector depends on your design elements. Use vector graphics (AI, EPS, PDF) for logos, text, and line art because they scale infinitely without losing quality. Use raster images (JPEG, PNG, PSD) for complex photographs and realistic textures that require specific pixel data for depth and color blending.
Understanding the technical differences between these formats is crucial for ensuring your cardboard displays look professional on the sales floor. Let's break down exactly why this matters for your specific packaging needs and how to avoid costly printing mistakes.
When should you choose vector instead of raster?
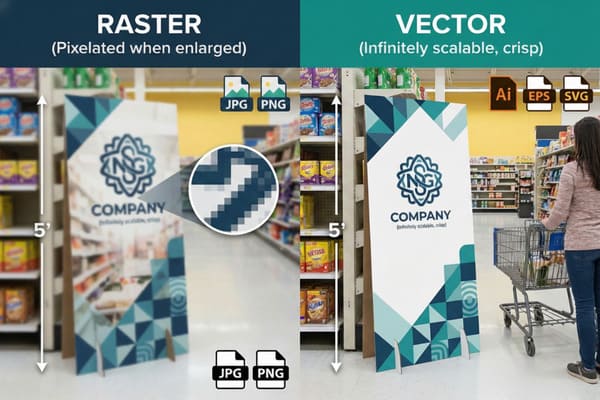
You are finalizing the artwork for a new floor display that will stand five feet tall in a major retail chain. The logo looks crisp on your computer screen, but you need to be absolutely certain it will stay that way when enlarged to full size.
Choose vector graphics whenever you are working with branding elements like logos, typography, geometric shapes, or structural dielines. Vectors use mathematical equations to define lines, allowing them to be resized to any dimension—from a small hang tag to a large pallet display—without ever becoming pixelated or blurry.
The Mathematics Behind Sharp Branding
To understand why vectors are non-negotiable for certain parts of your packaging, you have to look at how the file is constructed. Vector files1, typically created in software like Adobe Illustrator, do not use pixels. Instead, they use mathematical paths—points, lines, and curves—to describe the image. When you send a file to a printer, the machine reads these mathematical instructions. This is why you can take a vector logo that is 2 inches wide and stretch it to cover the entire side header of a floor display that is 40 inches wide, and the lines will remain razor-sharp.
In the context of cardboard packaging production, this is critical for two main reasons: printing clarity2 and cutting precision. First, for text and logos, even the slightest blurriness (aliasing) caused by raster pixels makes the packaging look cheap and unprofessional. In a competitive retail environment, customers associate low-quality print with low-quality products. Second, the structural design of your box—the "dieline"—must be a vector. The CNC cutting tables (like Zünd or Kongsberg machines) or physical die-cutting molds used in our industry follow these vector paths to cut the cardboard. If you provide a raster image of a cut line, the machine cannot read it. The factory would have to manually trace it, which introduces errors, alters dimensions, and ultimately delays your production timeline.
| Feature | Vector Graphics | Raster Images |
|---|---|---|
| Basic Unit | Mathematical paths (points/lines) | Pixels (colored squares) |
| Scalability3 | Infinite (no quality loss) | Limited (pixelates when enlarged) |
| File Types4 | .AI, .EPS, .PDF, .SVG | .JPG, .PNG, .TIFF, .PSD |
| Best Used For | Logos, Text, Dielines, Icons | Photos, Complex Gradients, Textures |
| File Size | Generally small and lightweight | Can become very large at high res |
I see many clients send low-res JPEGs for their logos, which stops production immediately. At PopDisplay, my design team reviews your files the moment they arrive. We convert simple raster logos into vectors for free to ensure your branding looks sharp on the final sample.
What is the benefit of using vector graphics for packaging design?
Big retailers like Walmart or Costco have strict compliance guides and high standards for the packaging they allow in their stores. They will reject packaging that looks amateurish, has unreadable text, or fails to meet barcode scanning requirements.
The primary benefit of using vector graphics for packaging is the ability to maintain absolute edge sharpness and small text legibility on absorbent materials like corrugated cardboard. Additionally, vector files result in smaller file sizes for simple designs and are required for processes like foil stamping, embossing, and CNC cutting paths.

Operational Efficiency in Manufacturing
Beyond just the visual quality, using vector graphics5 significantly improves the manufacturing efficiency of your cardboard displays. When we move from the digital design phase to physical production, the file type dictates the workflow. In the cardboard industry, we often use Spot Colors (Pantone/PMS)6 rather than just CMYK printing to ensure brand colors are consistent. Vector files allow prepress technicians to easily separate these color layers. For example, if your brand color is a specific bright orange (e.g., PMS 165 C), a vector file allows us to isolate that orange and print it as a dedicated ink. In a raster file, that orange is a mix of thousands of multi-colored pixels, making it nearly impossible to color-match perfectly on a printing press.
Furthermore, vector graphics are editable. If you need to make a last-minute change to a phone number or a regulatory warning on the back of the package, a vector file allows us to edit the text directly without destroying the background. If the text were rasterized into a flat image, we would have to Photoshop it out, which is messy and time-consuming. This editability is vital for meeting tight deadlines. Additionally, as mentioned previously, the cutting equipment relies entirely on vector data. The "registration marks" that tell the cutter where to cut relative to the print are also vectors. Without this vector data, the alignment between print and cut would be a guessing game, leading to high waste rates and increased costs for you.
| Benefit | Explanation | Impact on Production |
|---|---|---|
| Color Separation7 | Easy to isolate PMS/Spot colors | Guarantees brand color consistency |
| Editability8 | Text and lines remain editable objects | Allows for quick, last-minute fixes |
| Equipment Ready | Native language for cutters/plotters | Ensures precise cutting and folding |
| Clean Lines | No anti-aliasing pixels on edges | Professional look on absorbent paper |
Color matching is a common pain point. I use vectors to separate Pantone layers specifically for our printing press. If you are unsure about your dielines, my engineers will fix the structural vectors for you before we start the sample making process to guarantee stability.
Does raster or vector reduce quality?
Quality is subjective until you see a fuzzy image on a finished box and realize it degrades the perceived value of your product. You might wonder if converting a file from one format to another causes the damage or if one format is inherently superior.
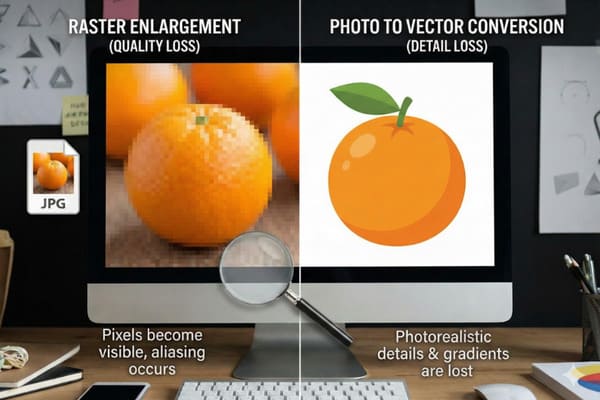
Raster images reduce quality when they are enlarged beyond their original resolution, resulting in pixelation (aliasing). Vector graphics never reduce quality regardless of scale. However, converting a photograph into a vector can reduce quality by losing photorealistic details and color gradients, making the image look cartoonish or flat.
Resolution Dependence vs Independence
The concept of "reducing quality" is largely about resolution dependence9. Raster images are resolution-dependent. They are a fixed grid of pixels captured at a specific moment. If you take a product photo of a crossbow at 4 inches wide and 300 DPI (Dots Per Inch), and you try to stretch it to cover a 20-inch wide header on a display, the software has to invent pixels that don't exist. This creates a blocky, "stair-step" look known as pixelation. Once a raster image is created at a low resolution, you cannot "add quality" back into it. This is the most common reason for quality reduction in packaging print.
On the other hand, vectors are resolution-independent10. They do not lose quality when scaled up. However, you can "reduce quality" by forcing the wrong content into a vector format. If you try to auto-trace a high-resolution photograph of a forest into a vector, the software will attempt to simplify the millions of colors into solid shapes. The result is a loss of detail, depth, and realism, turning a photo into something that looks like a paint-by-numbers drawing. Therefore, quality reduction happens in two ways: stretching a raster too big (pixelation) or forcing a complex raster into a simplified vector (loss of detail). For high-end packaging, knowing which format preserves the integrity of the specific image type is key to maintaining a premium look.
| Action | Result on Raster | Result on Vector |
|---|---|---|
| Scaling Up11 | Severe quality loss (Pixelation) | No quality loss (Perfectly sharp) |
| Scaling Down | Possible loss of fine detail | No quality loss |
| File Conversion12 | N/A (Already pixels) | converting photo to vector loses realism |
| Printing | Requires high DPI (300+) | Always prints at max device resolution |
I often receive 72 DPI images for large floor displays, which look terrible when printed. We always check your raster files to ensure they are at least 300 DPI at full size. If the quality is too low, I will alert you before we waste any material.
When should you use raster files?
You want to show the intricate camouflage pattern on your hunting gear or the detailed mechanical components of your product. A simple line drawing will not convince a hunter to buy your product; they need to see the reality of what they are purchasing.
You must use raster files when your packaging design includes high-quality photography, complex illustrations with soft gradients, or specific textures like wood grain and camouflage. These images rely on a grid of colored pixels to render subtle shifts in light and shadow that vector paths cannot replicate effectively.

Handling Photorealism in Large Format Printing
While we have established that vectors are superior for text and logos, raster files are the undisputed kings of photorealism13. In the hunting and outdoor industry, the visual texture of the product is a major selling point. A vector cannot accurately represent the chaotic, organic patterns of a forest floor camouflage or the metallic sheen of a compound bow's cam system. These require "continuous tone" images, where colors blend seamlessly into one another. To achieve this on cardboard packaging, we typically use raster formats like TIFF or high-quality PSDs.
The critical factor here is file resolution14 relative to the print size. For a standard litho-laminated box (where we print on paper and glue it to the cardboard), we need the raster image to be 300 DPI (dots per inch) at the actual print size. If you are designing a life-size standee, that file might be massive—hundreds of megabytes or even gigabytes. This is acceptable and necessary. We also need to consider the color mode. Raster images for screens are RGB, but for printing, they must be converted to CMYK. This conversion can shift colors, making bright neon greens look duller. A high-quality raster file handles these complex color data points in a way that vectors simply cannot. Therefore, for the "appetite appeal" or "product hero shot" on your display, raster is the only option.
| Requirement | Recommendation | Reason |
|---|---|---|
| Resolution | 300 DPI at full size15 | Ensures crispness on litho-lamination |
| Color Mode | CMYK (Cyan, Magenta, Yellow, Black)16 | Matches physical ink pigments |
| File Format | .TIFF or .PSD (Layered) | Preserves data without compression artifacts |
| Content Type | Photos, Textures, Painted Art | Captures depth and lighting effects |
For your hunting products, the camouflage texture must look real. I recommend using high-resolution TIFF files for these images. My team uses advanced color management systems to ensure the printed raster image matches your original photography perfectly, even on corrugated material.
Conclusion
To create the most effective packaging, you rarely choose just one format. The best designs combine both: they use vectors for the structural dielines, logos, and typography to ensure perfect sharpness and cut accuracy, while using high-resolution raster images for product photography and textures. By understanding when to apply each, you ensure your displays are durable, attractive, and ready for retail.
Understanding vector files is crucial for achieving high-quality packaging design and ensuring clarity in printing. ↩
Exploring printing clarity will reveal its impact on brand perception and product quality in competitive markets. ↩
Understanding scalability in vector graphics can help you choose the right format for your design needs. ↩
Exploring file types will guide you in selecting the best format for your projects, ensuring optimal quality and compatibility. ↩
Explore how vector graphics enhance manufacturing efficiency and quality, ensuring precise color matching and easy edits. ↩
Learn about the significance of Spot Colors in achieving brand consistency and high-quality prints in manufacturing. ↩
Understanding Color Separation can enhance your printing quality and ensure brand consistency. ↩
Exploring Editability can help you make quick adjustments, improving your design workflow. ↩
Understanding resolution dependence is crucial for maintaining image quality in design and printing. ↩
Exploring resolution-independent concepts helps in choosing the right format for high-quality graphics. ↩
Understanding the effects of scaling up can help you choose the right image format for your projects. ↩
Exploring this topic will clarify the trade-offs between realism and scalability in image formats. ↩
Understanding photorealism is crucial for creating stunning visuals in large format printing, enhancing your design skills. ↩
Exploring file resolution will help you grasp its impact on print quality, ensuring your projects look professional and vibrant. ↩
Understanding 300 DPI helps ensure your prints are sharp and professional, crucial for high-quality results. ↩
Exploring CMYK will clarify how color accuracy is achieved in print, essential for any design project. ↩


