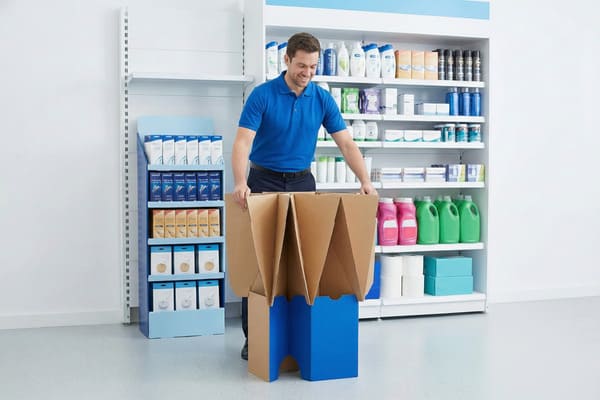
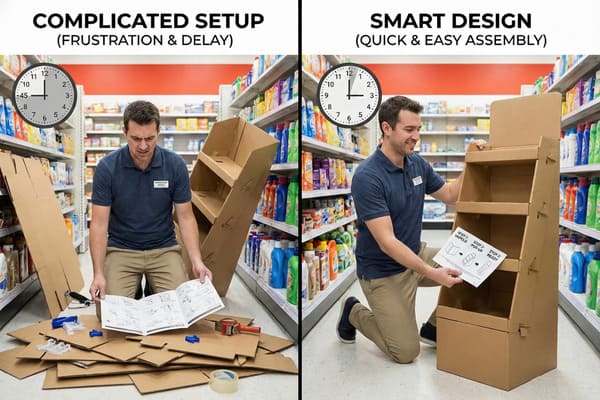
Retail efficiency relies heavily on how quickly your team can deploy marketing materials. Complicated setups lead to frustration, damaged displays, and wasted labor hours, while smart designs ensure your products hit the floor immediately.
Most modern cardboard displays are designed for easy assembly, often taking under 5 minutes. Features like pop-up mechanisms, pre-glued parts, and clear instruction sheets significantly reduce setup time. However, complexity varies based on structural design and load-bearing requirements.
We need to look at the specific engineering choices that turn a cardboard puzzle into a functional sales tool.
How to make rotating display stand easy?
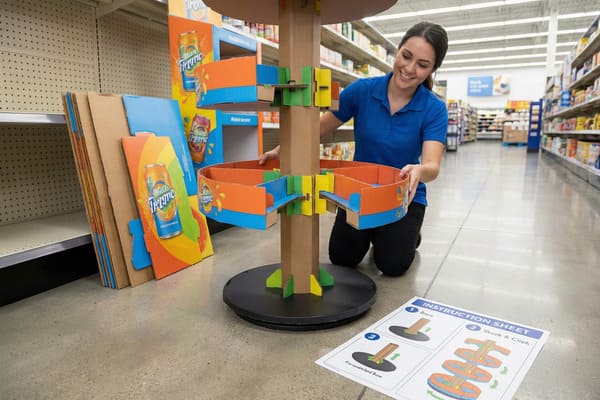
Rotating stands grab customer attention but often scare off retailers due to perceived mechanical complexity. Simple engineering changes can make these dynamic units just as easy to build as static ones.
To make a rotating display stand easy, utilize a pre-assembled Lazy Susan base and modular stacking components. Ensure the central axis is reinforced but lightweight. Clear, numbered visual instructions and color-coded connecting parts prevent confusion during store installation.
The Engineering Behind Smooth Rotation
The biggest fear buyers have with rotating displays is that they will wobble or stick. This usually happens when the design relies on the end-user to assemble the bearing mechanism. To solve this, the rotation system must be integrated at the manufacturing level, not the retail level. When we design for heavy items like outdoor gear or tools, we cannot rely on simple paper-on-paper friction. We have to use a "Lazy Susan1" style base. This is a double-plate system with ball bearings sandwiched between them.
From a structural standpoint, the base needs to be made of double-wall corrugated board or even honeycomb cardboard. This provides a rigid foundation that will not warp under the weight of the products. If the base warps, the rotation stops. For the vertical tower, we use a central core design. This core slots directly into the pre-assembled base. This means the store employee does not need to mess with screws or bearings. They simply take the base out of the box, place it on the counter, and slide the display body over the central pillar.
We also have to consider the "PDQ2" (Pretty Darn Quick) requirements of major retailers like Walmart or Costco. They demand displays that are ready to sell. For a rotating stand, this often means the shelves are already glued to the central core. The only assembly required is stacking the tiers. By moving the complexity to the factory floor, we reduce the in-store assembly time from twenty minutes to thirty seconds. This reduction in labor is a major selling point when you are pitching your products to big-box retailers.
| Rotation Mechanism | Weight Capacity | Assembly Time | Smoothness | Cost |
|---|---|---|---|---|
| Plastic Bearing | Low (1-3kg) | 2 Minutes | Medium | Low |
| Metal Ball Bearing3 | High (10kg+) | Instant (Pre-assembled) | High | Medium |
| Cardboard Disc | Very Low (<1kg) | 5 Minutes | Low | Very Low |
| Motorized Base4 | High | Instant | Consistent | High |
I always pre-install the rotating base in my factory to ensure smooth movement before shipping. We use high-grade bearings that handle heavy hunting gear, so your team only needs to attach the main body, saving them hours of frustration.
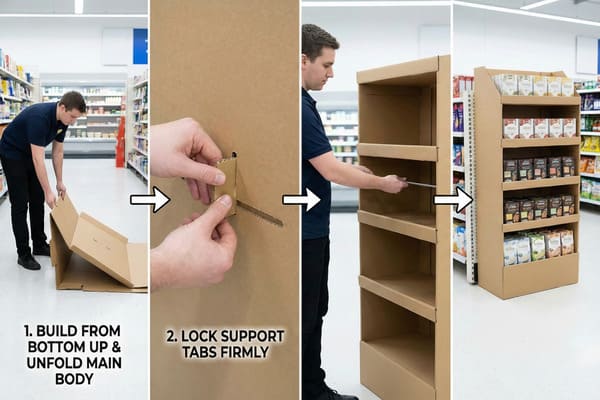
How to set up display shelves?
Wobbly shelves damage expensive products and ruin your brand reputation. Proper setup ensures safety and visual appeal, especially for heavier items that require strict structural integrity.
Setting up display shelves involves unfolding the main body, locking the support tabs into place, and inserting reinforcement bars if needed. Always build from the bottom up to maintain stability. ensure all corrugated edges are folded inward for a clean look.
Structural Integrity and Locking Mechanisms
The stability of a shelf comes down to the flute profile of the cardboard and the locking mechanism5 used. For standard retail products, a B-flute is common, but for heavier goods, we often switch to EB-flute or varying grades of double-wall board. The assembly process usually fails when the locking tabs are weak or confusing. A good design uses a "tab-and-lock" system where the shelf folds over and clicks into the side walls. This creates a double layer of cardboard on the side panels, significantly increasing the vertical stacking strength.
One major issue I see in the industry is shelf sagging6. This happens when the span of the shelf is too wide without support. To fix this during setup, we often include metal support bars or corrugated reinforcement bars (corrugated tubes) that sit hidden under the shelf lip. The person assembling the unit simply slides these bars in before folding the shelf flap down. It adds seconds to the assembly time but doubles the weight capacity.
Safety is another factor. Raw corrugated edges can give nasty paper cuts. A high-quality display will use "rolled edges" or "waterfall" designs. This means the paper folds over the front lip, hiding the raw edge. This not only protects the hands of the person setting it up but also makes the display look more premium. The instructions must be visual. We use 3D rendered step-by-step images rather than text, because store clerks often do not speak English as a first language or simply do not read blocks of text. Clear visual cues like "Click" icons or color-coded arrows make the process intuitive.
| Shelf Support Type | Assembly Method | Load Capacity (Per Shelf)7 | Best Application8 |
|---|---|---|---|
| Standard Tab | Fold and Tuck | 2-5 kg | Snacks, Cosmetics |
| Corrugated Clip | Insert Separate Clip | 5-10 kg | Beverages, Toys |
| Metal Bar Reinforcement | Slide under shelf | 15-25 kg | Tools, Electronics |
| Divider Grid | Interlocking grid | 30 kg+ | Heavy Bottles, Parts |
I implement a double-locking tab system in every shelf design to prevent collapse under heavy loads. We test these structures with 20kg weights in our lab, guaranteeing your products stay secure without requiring complex tools during assembly.
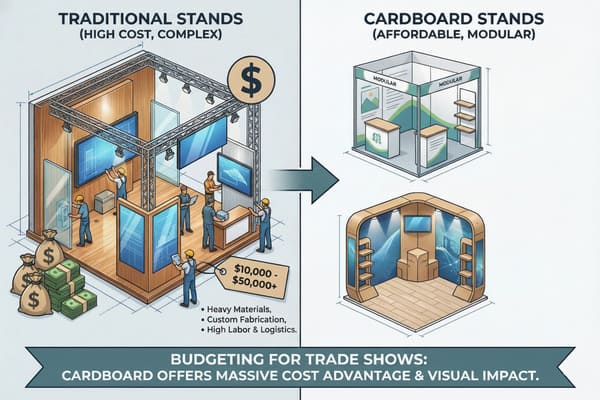
How much does it cost to build an exhibition stand?
Budgeting for trade shows requires balancing visual impact with affordability. Costs vary wildly based on size, materials, and structural complexity, but cardboard offers a massive advantage over traditional materials.
Building a cardboard exhibition stand typically costs between $500 and $3,000 depending on size and customization. Standard modular kits are cheaper, while custom shapes with high-end digital printing and structural reinforcements for heavy products command higher prices.
Cost Drivers in Temporary Structures
When you calculate the cost of an exhibition stand, you have to look beyond just the manufacturing price. Traditional wood or metal booths are expensive to build, heavy to ship, and often require union labor to install at the venue. Cardboard changes this equation. The primary cost driver for cardboard stands is the "tooling9" or cutting molds. For a completely custom shape, we have to make new die-cut molds, which can cost a few hundred dollars. However, digital cutting machines have lowered this barrier for short runs, allowing us to produce one-off custom shapes without expensive molds.
Material quality is the second factor. Standard kraft paper is cheap, but for a trade show, you want "white top" or K-flute materials that provide a smooth surface for high-resolution printing. Digital printing is a game-changer here. It allows us to print photo-quality graphics directly onto the cardboard without the setup costs of lithographic plates. This means a small brand can have the same print quality as a global corporation without the massive volume requirement.
Shipping is the hidden cost that kills budgets. A metal booth might cost $2,000 to ship across the country. A cardboard booth creates a "flat pack" that fits on a single pallet or even in the back of a large SUV. This reduces logistics costs by 60% to 80%. Furthermore, because cardboard is lightweight, you avoid "drayage" fees (the cost to move goods from the dock to the booth) at the convention center, which are charged by weight. So, a $2,000 cardboard booth might actually save you $5,000 in total show costs compared to a traditional build.
| Cost Component | Traditional Stand (Wood/Metal) | Cardboard Stand | Savings Factor |
|---|---|---|---|
| Production10 | $5,000 – $15,000+ | $500 – $3,000 | High |
| Shipping11 | Heavy Freight ($1,000+) | Standard Parcel/LTL ($200) | Very High |
| Installation | Skilled Labor/Union | DIY (1-2 People) | High |
| Disposal | Dumpster Fees | Recycle Bin | Time & Money |
I help you cut costs by offering free tooling on standard modular designs and optimizing the flat-pack structure to reduce shipping fees. My team uses digital printing for short runs, giving you premium visuals without the expensive plate charges.
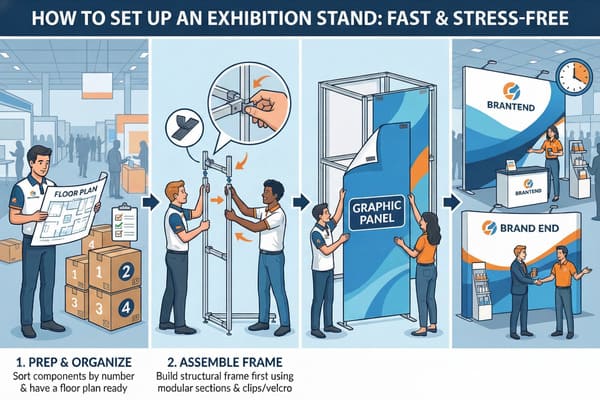
How to set up an exhibition stand?
Trade show setup time is limited and stressful. A well-designed stand should go up fast, leaving you time to network, rather than sweating over complicated instructions.
Setting up an exhibition stand requires sorting components by number, assembling the structural frame first, and then attaching graphical panels. Use modular sections that connect via velcro or plastic clips rather than glue. Always have a floor plan ready before starting.
Modular Assembly Strategies for Events
The key to a stress-free exhibition setup is modularity12. We cannot ship a ten-foot wall in one piece, so we break it down into manageable panels, usually about one meter wide each. These panels need to connect seamlessly. We avoid glue at all costs for event setups because it is messy and takes time to dry. Instead, we use plastic rivets or industrial-strength Velcro. Velcro is particularly good because it allows for minor adjustments if the floor is uneven, which is common in convention centers.
The structure usually follows a "rib and skin" method or a box method. In the rib method, you build an internal skeleton and then wrap the printed graphic around it. This is very strong but has more parts. The box method involves stacking large, pre-folded cubes or triangular prisms. This is incredibly fast—you just pop the boxes open and stack them. However, for premium looks, we often use "tab-locking" walls where the connections are hidden inside the structure.
Before you even leave for the show, a "dry run" is mandatory. In my factory, we fully assemble the booth to check the graphics. We label every single part with a number sequence (e.g., A1 connects to A2). This acts like a map. When you arrive at the booth, you lay out the parts on the floor in their approximate positions before you start building. This prevents the nightmare scenario of building half the wall and realizing piece #4 is at the bottom of the stack.
| Connection Type | Assembly Speed | Reusability | Structural Strength |
|---|---|---|---|
| Plastic Rivets13 | Fast | High | High |
| Velcro Strips | Very Fast | Medium | Medium |
| Interlocking Tabs | Medium | High | High |
| Permanent Glue14 | Slow | None | Very High |
I ensure every exhibition kit is fully assembled and inspected in my factory before packing to verify fit. We provide a video guide and number every part, so you can set up a twenty-foot wall in under an hour.
Conclusion
Easy assembly is not just about convenience; it directly impacts your operational costs and the final presentation of your brand. By choosing displays with smart engineering and pre-assembled components, you ensure a flawless retail execution every time.
Explore this link to understand the mechanics of a Lazy Susan, which is crucial for designing stable rotating displays. ↩
Learn about PDQ requirements in retail to see how they impact product display efficiency and sales. ↩
Explore the benefits of Metal Ball Bearings for high weight capacity and smooth operation. ↩
Learn how a Motorized Base enhances efficiency and consistency in various applications. ↩
Explore this link to learn about innovative locking mechanisms that enhance stability and ease of assembly in cardboard displays. ↩
Discover solutions to prevent shelf sagging, ensuring your displays maintain their integrity and support heavier products effectively. ↩
Understanding load capacity is crucial for safety and efficiency in storage solutions. ↩
Exploring best applications helps in selecting the right shelving for specific needs. ↩
Understanding tooling is crucial for optimizing costs in custom exhibition stands, especially when using cardboard. ↩
Learn more about the cost differences in production to make informed decisions for your business. ↩
Explore this link to understand how standard parcel shipping can significantly reduce costs and improve efficiency. ↩
Exploring this resource will provide insights into how modularity enhances efficiency and flexibility in event planning. ↩
Explore the benefits of Plastic Rivets for fast assembly and high reusability, ideal for various projects. ↩
Learn about Permanent Glue's structural strength and its ideal applications in construction and repairs. ↩


