Generic displays get ignored and burn budget. You need a structure that grabs attention and survives retail abuse. Here is the messy reality of engineering displays that sell.
To customize a cardboard display effectively, brands must align structural integrity with visual impact using this technical framework:
Material Specification: Selecting corrugated flutes (B, E, or Double-Wall) based on product weight.
Format Choice: Determining display types like floor stands, counter units, or tiered bins.
Graphic Application: Utilizing UV (Ultraviolet) printing and custom layouts for clear brand messaging.
Logistics Strategy: Optimizing flat-pack versus pre-assembled configurations for distribution.
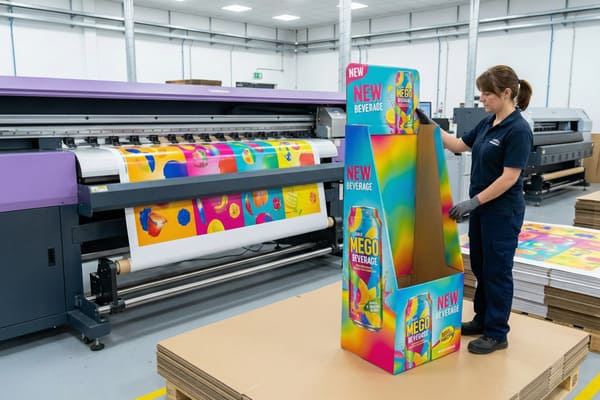
Most brands think customization is just about artwork, but the real magic happens in the structural engineering. Before we worry about colors, we have to ensure the box doesn't collapse. Below, I break down the exact factory process we use to turn a flat sheet of paper into a sales machine without breaking the bank.
How do you make a cardboard display stand?
A drawing is not a display. Turning a PDF concept into a standing structure that holds 50 lbs (22.7 kg) requires physics, specific machinery, and a lot of patience.
To make a cardboard display stand, you must navigate a specific production sequence:
Corrugation: Laminating your printed linerboard onto the fluted medium.
Die-Cutting: Using steel-rule dies to cut your specific shape and fold lines.
Gluing: Bonding the structural components using high-strength adhesive.
Packing: Assembling the unit into a flat-pack or pre-filled shipper for your retail launch.
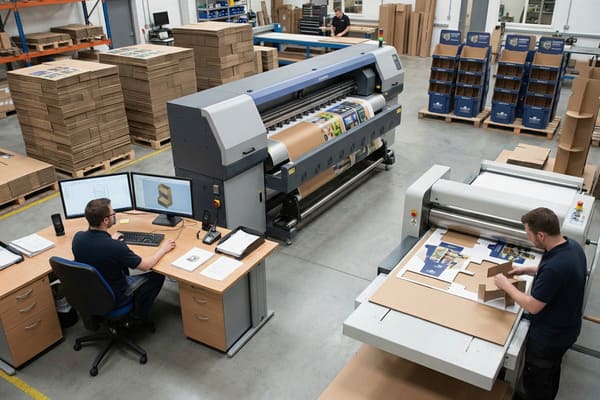
The Manufacturing Reality: Dielines, Grain & Glue
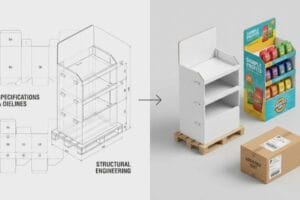
Most clients send me a pretty picture from a creative agency and think it's ready to print. It never is. The agency cares about colors; I care about gravity. Real manufacturing starts with the Dieline Template1. I see this bottleneck every week: a designer spends 40 hours drawing on a blank canvas in Adobe Illustrator, only to find out their design is geometrically impossible to fold. Cardboard has thickness—usually 3mm or 5mm. If you don't account for this "material allowance" at the fold lines, the box won't close, or it will tear at the spine. To fix this, I force a "Structure First" workflow. We create the structural CAD file using ArtiosCAD software before you start designing.
Then comes the "White Sample" Protocol. I refuse to let mass production start until you physically touch an unprinted prototype. We use Kongsberg digital cutting tables to cut a sample in 24 hours. You need to put your actual product in it. Why? Because I've seen expensive perfume bottles slide right off a "theoretical" shelf. We test the friction coefficient and the lip height with your physical product. If it wobbles, we fix it immediately.
Once the structure is approved, we have to engineer the "Grain Direction2." Corrugated cardboard has flutes that run in one direction. If a designer places that grain horizontally on a load-bearing wall, the display buckles immediately. It's simple physics. My engineers always orient the grain vertically to maximize stacking strength (BCT). We also adhere to a "Safety Factor of 3.53." If your product load is 100 lbs (45 kg), we build the display to withstand 350 lbs (158 kg) to account for humidity, which can weaken the board by 30% in a damp warehouse. Finally, we audit the glue temperature daily. Using "summer glue" in a freezing truck causes the bond to snap, so we switch adhesives based on the season.
| Feature | Standard "Agency" Process | My "Factory" Process |
|---|---|---|
| Design Start | Artwork First (Guesswork) | Structure First (Dieline) |
| Validation | 3D Render Only | Physical White Sample |
| Grain Orientation | Random / Cost-Optimized | Vertical / Strength-Optimized |
| Safety Factor | 1.5x Load Capacity | 3.5x Load Capacity |
Customization isn't just about the logo; it's about the structural integrity. I provide 4K 360-degree video renderings so you can see how the back panel folds before we cut a single piece of paper, avoiding surprises when the container opens.
What are custom display boxes?
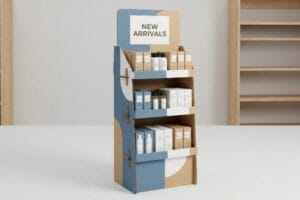
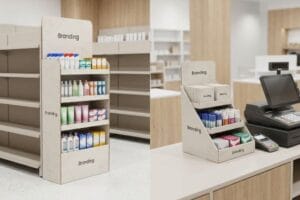
These aren't just shipping cartons. They are your "Silent Salesman." A generic brown box hides your product; a custom display box shouts at the shopper to pick it up.
Custom display boxes are specially designed, branded packaging used in retail and events to showcase products attractively. These units increase visibility and sales by featuring unique shapes, high-resolution graphics, and structural materials like cardboard or rigid board, often utilizing header tabs or windows for enhanced branding and product presentation.
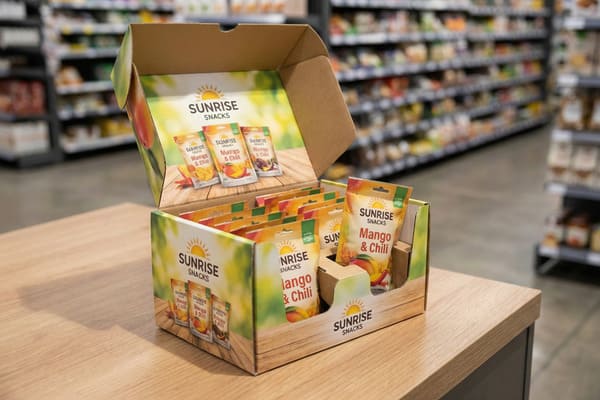
PDQ Mechanics & The "Tipping Point4"
The biggest mistake I see with PDQ (Product Display Quantity) boxes is the "Lip Height5." Designers love big logos, so they make the front lip of the tray 3 inches (7.6 cm) tall. But if your product is only 4 inches (10 cm) tall, you just hid 75% of it behind a cardboard wall. Shoppers can't buy what they can't see. I enforce a "Product First" rule. The lip should be a fence, not a billboard. We use a die-cut dip to ensure at least 85% of your product is visible.
Another nightmare is the "Tipping Point." Lightweight counter displays often tip over backwards when the first few products are sold because the center of gravity shifts. It's embarrassing. To fix this, I add a hidden "False Bottom" with a double-thick corrugated pad to lower the center of gravity. Or, we design an "Extended Easel Back" wing. It's not fancy, but it keeps the unit stable.
We also have to fight the "Tier Sag6." In tiered displays, the middle of the shelf often bows downward under the weight of the product, especially with liquids or heavy jars. Standard cardboard isn't enough. To solve this, we engineer a hidden Metal Support Bar7 (a hollow steel tube) that sits invisibly under the front lip. Alternatively, we use a "Rolled Edge" structure where the cardboard is folded over three times to create a rigid beam. This prevents the display from looking broken after two days of sales. I also calculate the "Headspace" in the master carton. If the display box fits too tightly, the corners get crushed during shipping. We leave a calibrated gap with air-cell buffers to ensure it arrives pristine.
| Design Flaw | The Consequence | My Technical Fix |
|---|---|---|
| High Front Lip | Hidden Product (Low Sales) | Die-Cut "Dip" (Max Visibility) |
| Unbalanced Base | Tips Over Backwards | False Bottom / Weighted Insert |
| Weak Shelves | Sagging / Bowing | Metal Support Bar / Double Fold |
| Tight Packing | Damaged Corners | Air-Cell Corner Buffers |
I learned this the hard way with a cosmetic brand. Their beautiful tall header card made the box top-heavy, and it kept falling off the counter. We had to rush-ship weighted inserts to 500 stores. Now, I calculate the physics before we cut the sample.
Can you print onto cardboard?
Yes, but it's tricky. Cardboard is like a sponge. If you just slap ink on it, it looks dull and muddy. You need the right process to make it pop.
Yes, you can print onto cardboard using flexography for simple logos or lithographic (offset) lamination for high-resolution imagery. The process involves transferring ink onto a paper liner which is then glued to the corrugated flute, preventing the "washboard effect" and ensuring vibrant color reproduction.
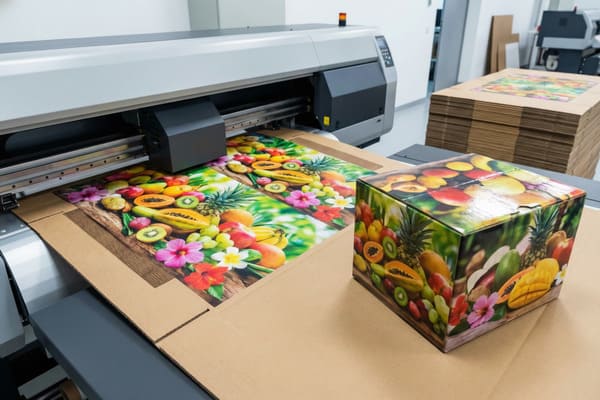
The "Washboard" Battle & Technical Ink Solutions
The biggest complaint I get from new clients is "Why doesn't my red look like the Coke Red on my screen?" Marketing managers approve designs on bright backlit MacBooks (RGB), but printing uses ink on paper (CMYK). Plus, standard B-flute cardboard has a wavy surface. When you print high-res photos on it, the waves show through. This is called the "Washboard Effect8." It makes premium brands look cheap. To fix this for luxury or tech clients, I automatically switch to E-Flute (Micro-Flute)9 or use a "Litho-Lam" process. We print on a smooth sheet of paper (SBS or CCNB) first, then glue it to the cardboard. It gives you a surface as smooth as a magazine cover.
However, printing is only half the battle; Registration10 is the silent killer. When corrugated board runs through a press, the paper hydrates from the wet ink and physically stretches. This causes "Drifting," where the shiny Spot UV finish doesn't line up with the logo, creating a blurry mess. To prevent this, I use a technique called "Trapping"—making the Spot UV layer 0.5mm larger than the logo to account for the stretch. It's a tiny detail, but it prevents the "misprinted" look.
Then there's the issue of Metallic Ink11. If you print Silver Pantone 877 directly on Kraft paper, the paper absorbs the metallic flakes, and it turns into a dirty gray. It looks awful. I advise clients to print a White Base Ink primer first, or better yet, use Cold Foil stamping. Finally, we apply a "Mop Guard" coating (varnish) to the bottom 3 inches of the display. This seals the ink so that when the store floor is mopped every night, the dirty water doesn't wick up and discolor your graphics.
| Print Method | Best For | Quality Risk | My Solution |
|---|---|---|---|
| Direct Flexo | Shipping Cartons | Low Res / Banding | Use for Text Only |
| Digital | Short Runs (<100) | Grainy / Matte | High-End Flatbed UV |
| Litho-Lam | Retail Displays | Washboard Effect | E-Flute / Clay Coated Liner |
| Metallic | Premium Logos | "Dirty" Grey Look | White Ink Base / Cold Foil |
I advise clients: "Don't look at the $0.50 savings on printing. Look at the brand impact." Using Litho-lamination guarantees that your display looks intentional, not like a leftover shipping box.
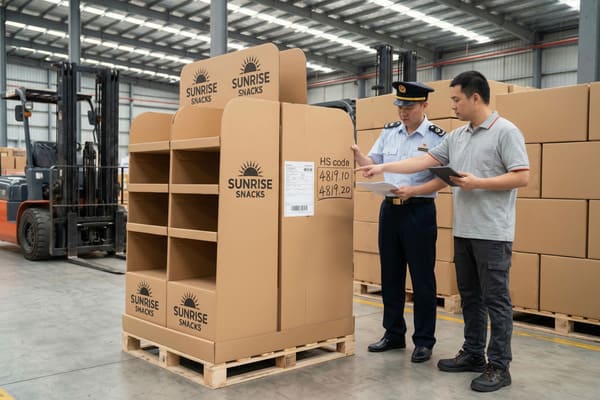
What is the HS code for cardboard display?
Get this wrong, and your budget is dead. Customs classifications determine your duty rate, and since the Trade War, errors here are expensive.
The HS code for cardboard displays is generally 4819.10 for corrugated paperboard containers used for packing, or 4823.90 for other paper articles depending on the structure. Correct classification is essential for determining import duties and ensuring compliance with customs regulations.
Logistics Strategy & The "Volumetric" Trap
Logistics is the invisible cost that kills margins. Many designers make displays that pack inefficiently, meaning you are shipping "air" in the container. I calculate the carton size to fit perfectly into a 40HQ container. We also have to deal with "Volumetric Weight12." Even if your display is light, if the box is huge, carriers charge you based on size. I practice "Nested Packing"—designing internal trays to fit inside the hollow base during shipping, like a Russian Matryoshka doll.
Compliance is another beast. We must file the ISF 10+213 data to US Customs 24 hours before loading the ship in China. If we miss this, you get fined $5,000 (approx £3,900). And don't forget the Pallet Size. The US runs on the 48×40 inch (122×102 cm) GMA pallet. If you send a European size, the automated warehouses in the US will reject it. I ensure every footprint fits the US grid perfectly.
Specifically regarding the HS Code, the strategy matters. If the display is shipped filled with product, it is often classified as part of the product packaging under 4819.10 (often duty-free or lower duty). However, if it is shipped empty as a standalone advertising material, it often falls under 4823.90, which can trigger the massive Section 301 tariffs (an extra 25% duty for Chinese goods). I analyze the "Essential Character" of the shipment. If it's a "Shipper Display," we argue for the packaging code. I advise clients on how to structure their commercial invoice descriptions to be legally compliant while avoiding unnecessary tax exposure.
| Logistic Factor | The Risk | My Expert Protocol |
|---|---|---|
| HS Code | High Tariffs (25%+) | Optimize for 4819.10 vs 4823.90 |
| ISF 10+2 | $5,000 Fine | Filed 72 Hours Pre-Loading |
| Pallet Size | DC Rejection | Strict 48×40" (122×102 cm) GMA |
| Packing | Shipping "Air" | Nested Design / Flat-Pack |
I don't just build the box; I engineer the invoice and the packing list. My team advises on the optimal documentation to ensure your container clears Long Beach without a headache.
Conclusion
Customizing a display isn't just about art; it's about survival. It's about fighting humidity, gravity, and strict retailer compliance rules. You need a partner who understands the difference between a pretty 3D render and a structure that actually stands up in Walmart.
Would you like to see if your design works in the real world? I can send you a Free Structural 3D Rendering or cut a physical White Sample for you to test with your product immediately.
Understanding Dieline Templates is crucial for effective packaging design, ensuring your product is manufacturable and visually appealing. ↩
Learning about Grain Direction is essential for optimizing the strength and durability of your cardboard packaging. ↩
Understanding the Safety Factor of 3.5 can enhance your knowledge of load capacity and product safety in packaging. ↩
Learn about the Tipping Point to ensure your displays remain stable and effective during sales. ↩
Understanding Lip Height can help you design displays that maximize product visibility and sales. ↩
Discover solutions to Tier Sag to maintain the integrity of your product displays over time. ↩
Explore how a Metal Support Bar can enhance the durability and functionality of your product displays. ↩
Understanding the Washboard Effect can help you avoid common printing pitfalls and ensure high-quality results. ↩
Explore the advantages of E-Flute for packaging to enhance the quality and appearance of your printed materials. ↩
Learn about the importance of registration in printing to prevent costly mistakes and ensure precise designs. ↩
Discover effective techniques for using Metallic Ink to achieve stunning results without compromising quality. ↩
Understanding Volumetric Weight can help you optimize shipping costs and avoid unnecessary fees. ↩
Exploring ISF 10+2 will ensure you stay compliant with customs regulations and avoid hefty fines. ↩