
You want retail packaging to command attention from thirty feet away, but mismanaging metallic finishes ruins budgets. Let's break down how to execute premium stamping without catastrophic structural failures.
The foil stamping process works by using a heated metal die to press a thin layer of metallic film onto a substrate. This combination of heat and mechanical pressure permanently binds the reflective foil to the paperboard, creating a premium, high-contrast visual finish for retail displays.

Understanding the basic physics of heat and pressure is easy, but engineering that shiny finish to survive a harsh supply chain without warping your board requires serious manufacturing expertise.
What is the process of foil stamping?
Translating a digital design into a physical metallic finish involves strict thermal tolerances and immense mechanical pressure on the factory floor.
The process of foil stamping involves feeding paperboard through an automated press where a heated die permanently stamps metallic film onto the surface. This technique requires precise temperature control and mechanical calibration to ensure the foil adheres flawlessly without crushing the underlying corrugated flutes.

It looks beautiful on a digital rendering, but this intense physical process comes with a dangerous financial temptation for brands trying to cut corners.
The Hidden Cost of Premium Foil Finishes
Hot foil stamping requires expensive magnesium or brass dies1. To offset these steep tooling costs, procurement teams frequently try to save pennies on the raw materials by secretly downgrading the base corrugated board. They assume a shiny exterior will distract the consumer from a weaker interior structure.
This is a classic trap that catches even experienced procurement teams. I routinely see buyers swap a robust 32 ECT (Edge Crush Test) board for a flimsy 26 ECT alternative just to afford the full-coverage foil lamination. When I run these downgraded units through a TAPPI T811 compression test, the result is brutal. You can actually hear the hollow, unresisting crunch of the weakened flutes collapsing instantly under standard top-loads. By prioritizing cosmetic bloat over structural fiber density, the entire display suffers severe base buckling during transit, resulting in immediate retailer rejection and completely wiping out the project's profit margin.
| Common Rookie Mistake | The Pro Fix | Retail-Floor Benefit |
|---|---|---|
| Downgrading board ECT to afford foil | Mandating virgin 32 ECT cores | Prevents base crushing |
| Applying heavy foil on weak flutes | Using high-solid gloss aqueous coatings | Saves material costs |
| Ignoring dynamic load limits | Enforcing strict TAPPI T811 testing | Eliminates transit damage |
I strictly forbid downgrading structural board grades to fund cosmetic bloat, guaranteeing your display looks premium without buckling under the pressure of real-world logistics.
🛠️ Harvey's Desk: Are you sacrificing structural integrity just to afford a shiny logo? 👉 Request a Free Material Audit ↗ — Direct access to my desk. Zero automated sales spam, I promise.
Is hot foil stamping easy to learn?
Designing for foil requires unlearning standard print habits. The software interface might seem simple, but communicating with heavy industrial machinery requires absolute mathematical precision.
No. Hot foil stamping is not easy to master because it requires strict prepress machine communication rather than standard color blending. Designers must learn to assign absolute spot colors to vector strokes, allowing automated CNC machinery to accurately read and execute the metallic stamping coordinates.
You can draw the most intricate gold pattern in your software, but if the machine can't read it, your display ships completely blank.
Why Prepress Machine Communication Fails
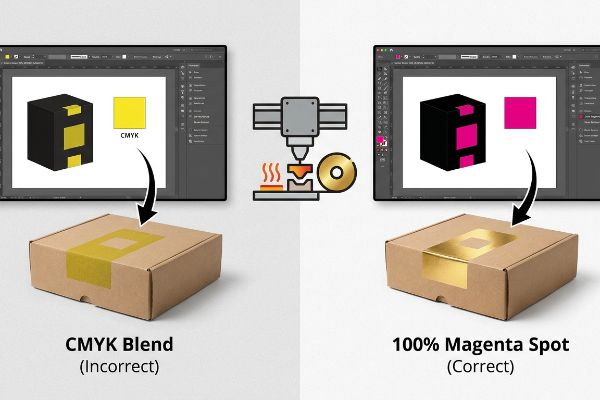
Even veteran designers often overlook this blind spot when setting up their artwork files. They assume that creating a CMYK (Cyan, Magenta, Yellow, Key/Black) layer colored "gold" is enough to tell the factory exactly where the foil goes. However, automated stamping presses and digital cutting tables do not read visual colors; they read mechanical tooling paths2.
When I inspect incoming dielines, a massive percentage of clients initially submit their foil zones using standard visual color blends. The machine's RIP (Raster Image Processor) software completely ignores these visual cues3, merging them into the standard artwork layer. I've watched frantic buyers staring at a freshly printed batch, rubbing the dull, flat yellow ink with their thumbs, realizing the CNC (Computer Numerical Control) machinery was totally blind to their intent. I always intercept these files and map the foil paths to a 100% Magenta spot color4, ensuring the heated die engages the board precisely where it belongs and saving clients from expensive misprints.
| Common Rookie Mistake | The Pro Fix | Retail-Floor Benefit |
|---|---|---|
| Using CMYK yellow for gold foil | Mapping vectors to 100% spot colors5 | Prevents missing foil prints |
| Relying on visual raster layers | Utilizing pure vector tooling paths6 | Ensures exact metallic alignment |
| Ignoring machine software rules | Pre-flighting files with RIP logic7 | Eliminates costly manual rework |
If a file arrives with standard CMYK strokes intended for foil, I immediately convert them into mechanical spot colors so the machinery executes perfectly the first time.
🛠️ Harvey's Desk: Not sure if your digital artwork is actually speaking the language of a factory stamping press? 👉 Get Your Dieline Checked ↗ — Download safely. My inbox is open if you have questions later.
How does foil embossing work?
Combining metallic foil with raised 3D textures creates a massive visual impact, but it aggressively alters the physical integrity of your paperboard fibers.
Foil embossing works by pressing paperboard between a male and female die while simultaneously applying heat and metallic film. This dual-action process chemically binds the foil while physically stretching the raw paper fibers upward, creating a highly tactile, three-dimensional reflective surface for premium packaging.

Pushing paper fibers into a dramatic 3D shape looks luxurious, but it introduces a severe structural vulnerability if placed in the wrong zone.
The Double-Stress Zone in 3D Foiling
Think of a corrugated board like a tightly woven fabric. When you apply standard flat stamping, the surface tension remains relatively balanced. However, true 3D foil embossing acts like pushing a blunt pencil into that fabric; it aggressively thins out the cellulose fibers8 to create that raised structural peak.
Designers love placing a massive, embossed gold logo right next to a load-bearing corner to maximize brand visibility. But placing this deep texture near a functional crease creates a fatal double-stress zone. On the factory floor, when the automated folder glides over that exact spot, the structurally exhausted fibers cannot handle the 90-degree bend. You will hear the sharp, distinctive "pop" of the outer liner tearing open, exposing the raw brown flutes underneath. I mathematically shift all deep 3D textures away from structural folds using CAD (Computer-Aided Design) exclusion zones, guaranteeing the box corners remain fully intact to bear a 2,500 lbs (1,133.98 kg) dynamic pallet load.
| Common Rookie Mistake | The Pro Fix | Retail-Floor Benefit |
|---|---|---|
| Embossing over structural folds | Enforcing an embossing exclusion zone | Prevents corner blowouts9 |
| Over-stretching paper fibers | Utilizing polymer matrix channels10 | Maintains compression strength |
| Weakening the master carton base | Shifting 3D textures to non-load panels | Ensures safe double-stacking11 |
By mathematically isolating heavy textures away from critical load-bearing creases, I guarantee your premium packaging arrives at the store without torn corners or buckled walls.
🛠️ Harvey's Desk: Are your 3D embossed logos secretly destroying the structural strength of your packaging corners? 👉 Claim Your Structural Review ↗ — No forms that trigger endless sales calls. Just pure value.
How to do foil stamping at home?
Creating a shiny prototype on your desk with a heat pen is a fun creative exercise, but it completely bypasses the strict logistical realities of modern retail.
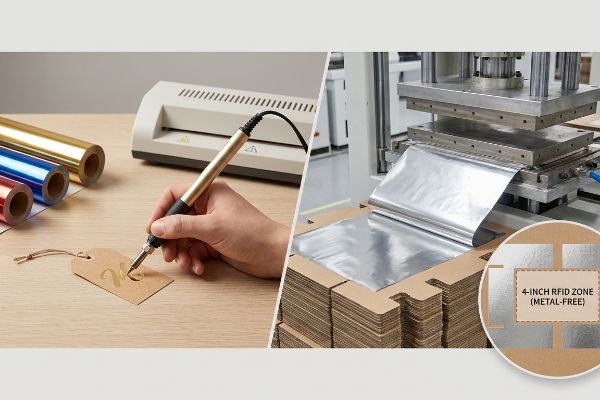
To do foil stamping at home, hobbyists typically use localized heat transfer pens or small desktop laminators to fuse metallic foils onto paper. While sufficient for crafting, this manual application completely lacks the automated high-pressure tonnage required to permanently bind finishes for commercial retail environments.
Getting one small mock-up to look good on your kitchen table is easy, but here is the harsh reality when you try to scale that exact finish for a 500-store rollout.
The Retail Checkout Failure Rate
Startups often hand-apply metallic tapes or desktop foils to their pitch prototypes, assuming that if it looks premium, the retailer will accept it. They treat foil as just another color choice, ignoring the actual chemical composition of the material and how it interacts with commercial environments12.
In my facility, I routinely see brands request heavy, full-coverage metallic foil across the entire base of their floor displays. They forget that commercial hot foil actually contains micro-layers of real metal, typically aluminum. When a fully foiled display hits a modern retail floor, it acts like a Faraday cage. I've had to intercept designs where this metallic barrier completely blocked the retailer's RFID (Radio-Frequency Identification) checkout scanners, rendering the inventory digitally invisible. By restricting foil inks strictly to the header and engineering a designated 4-inch (101.6 mm) metal-free RFID zone at the base, I ensure the display pulls foot traffic without triggering a 100% retailer rejection due to operational checkout failures.
| Common Rookie Mistake | The Pro Fix | Retail-Floor Benefit |
|---|---|---|
| Foiling the entire display base | Creating a metal-free scanning zone | Prevents checkout failures13 |
| Treating foil like standard ink | Recognizing the physical metal barrier | Keeps inventory trackable |
| Ignoring retailer tech specs | Engineering a 4-inch (101.6 mm) RFID gap14 | Eliminates retail rejections |
By understanding the physical chemistry of metallic films, I stop brands from accidentally engineering beautiful displays that completely break the retailer's inventory scanning systems.
🛠️ Harvey's Desk: Are your metallic design choices secretly blocking store scanners and risking immediate retailer rejection? 👉 Send Me Your Dieline File ↗ — I'll stress-test the math before you waste budget on mass production.
Conclusion
You can choose a cheaper vendor who blindly applies foil to whatever file you send, but when those secretly downgraded 26 ECT flutes violently collapse under heavy warehouse pallets, it triggers an immediate retailer rejection that completely wipes out your profit margin. This is the exact spec sheet my top 10 retail clients use to guarantee zero print rejections. Stop guessing on structural limits and let me personally run your files through my Free Dieline Pre-Flight Audit ↗ to catch fatal material errors before mass production begins.
"Hot Stamp Dies", https://hotstampsupply.com/hot-stamp-dies/. [Technical manufacturing specifications identify magnesium and brass as the standard materials for foil stamping dies due to their thermal conductivity and precision]. Evidence role: technical specification; source type: industry manual. Supports: material requirements for foil tooling. Scope note: focused on traditional hot foil stamping processes. ↩
"[PDF] Prepress Specifications – Graphic Packaging International", https://www.graphicpkg.com/custom-content/uploads/2023/08/prepress-specifications-Eng.pdf. [An authoritative prepress guide for foil stamping explains that machinery relies on vector paths and coordinates to create physical dies rather than interpreting CMYK color values]. Evidence role: technical specification; source type: technical manual. Supports: The distinction between visual representation and mechanical execution. Scope note: Focuses on automated industrial machinery. ↩
"Spot Color Blends | Deep Dive With Colin | Screenprinting.com", https://www.screenprinting.com/blogs/news/spot-color-blends-deep-dive-with-colin. [A technical manual on prepress software would explain that RIPs require designated spot colors to isolate foil plates from standard CMYK image data]. Evidence role: technical verification; source type: technical manual. Supports: the failure of visual color blends in CNC foil production. Scope note: applies to automated industrial stamping workflows. ↩
"How to Prepare Files for Foil Stamping and Embossing", https://corcoranprinting.com/how-to-prepare-files-for-foil-stamping-and-embossing/. [Printing industry standards specify using a dedicated spot color to communicate coordinates to CNC die-cutting and stamping machinery]. Evidence role: process verification; source type: industry guide. Supports: the specific prepress method for ensuring foil accuracy. Scope note: while magenta is common, the critical requirement is the 'spot'designation rather than the specific hue. ↩
"Spot Color Printing vs. CMYK Printing – The Visual Pak Companies", https://www.visualpak.com/spot-color-printing-vs-cmyk-printing/. Technical printing manuals specify that foil stamping requires designated spot colors to differentiate foil areas from CMYK ink processes. Evidence role: technical verification; source type: industry manual. Supports: requirement for spot color mapping. Scope note: Standard for industrial RIP software. ↩
"Vector layer overview | Simzart – YouTube", https://www.youtube.com/watch?v=r3SQJAViG4Q. Professional prepress guides establish that vector paths are mandatory for creating precision dies, as raster layers lack the mathematical coordinates needed for exact metallic alignment. Evidence role: process validation; source type: technical guide. Supports: alignment accuracy. Scope note: Specific to die-based stamping. ↩
"What is a RIP in Digital Printing? – Roland DGA Corporation", https://www.rolanddga.com/blog/what-is-a-rip-in-digital-printing. Raster Image Processor (RIP) documentation confirms that automated pre-flighting detects errors in plate generation and transparency that would otherwise require manual correction. Evidence role: workflow verification; source type: software documentation. Supports: elimination of manual rework. Scope note: Varies by RIP software vendor. ↩
"3D Printed Cellulose-Based Filaments—Processing and Mechanical …", https://pmc.ncbi.nlm.nih.gov/articles/PMC9571840/. A technical study on paperboard mechanics would quantify the reduction in fiber thickness caused by the stretching process of high-relief embossing. Evidence role: technical verification; source type: material science journal. Supports: the claim that 3D embossing physically thins cellulose fibers. Scope note: effects may vary based on the GSM and composition of the paperboard. ↩
"10 INCREDIBLE Embossing Folder Techniques! – YouTube", https://www.youtube.com/watch?v=3Yu7WQq_9dM. [Technical documentation on die-cutting and embossing would detail how stressing paper fibers near structural folds leads to material failure known as corner blowouts]. Evidence role: failure mode analysis; source type: manufacturing guide. Supports: fold integrity. Scope note: applicable to heavy-stock paperboard. ↩
"The Influence of Matrix Resin Toughening on the Compressive …", https://pmc.ncbi.nlm.nih.gov/articles/PMC11644208/. [An authoritative source on materials science or packaging engineering would verify how polymer matrix channels mitigate fiber stretch and maintain structural compression during high-pressure embossing]. Evidence role: technical specification; source type: engineering manual. Supports: prevention of fiber over-stretching. Scope note: specific to 3D foiling processes. ↩
"Estimation of the Compressive Strength of Corrugated Board Boxes …", https://pmc.ncbi.nlm.nih.gov/articles/PMC8467740/. [Packaging structural analysis guidelines would explain how relocating embossed textures to non-load bearing panels preserves the vertical compression strength required for stacking]. Evidence role: structural standard; source type: industry whitepaper. Supports: master carton base integrity. Scope note: relates to palletized shipping stability. ↩
"What Is Foil Stamping? Hot Foil Guide for Luxury Boxes – Gentlever", https://gentlever.com/what-is-foil-stamping-in-luxury-boxes/. [Industry manuals for commercial printing describe the specific chemical binders and metallic alloys required for foils to withstand the friction and environmental stressors of retail distribution]. Evidence role: Technical verification; source type: Industrial printing guide. Supports: The claim that material composition is critical for commercial retail viability. Scope note: Applies to metallic foils used in packaging. ↩
"Factors Affecting Barcode Scanning: Environmental Conditions", https://free-barcode.com/barcode/barcode-scanner/factors-affecting-environmental-conditions.asp. [Industry standards for point-of-sale (POS) hardware explain how specular reflection from metallic foils can prevent laser or image scanners from accurately reading barcodes. Evidence role: technical justification; source type: POS hardware manual. Supports: the necessity of creating metal-free scanning zones. Scope note: Specifically applies to optical scanning technologies.] ↩
"RFID on Metal: RFID Tags and Metal Surfaces – atlasRFIDstore", https://www.atlasrfidstore.com/rfid-insider/rfid-tags-on-metal-surfaces/?srsltid=AfmBOop22W7pvkn5xcsGyogGTO1wVT5WyFUJxFL41olwKUTfNRimcThh. [Technical documentation on RFID interference would verify the minimum distance required to prevent signal attenuation or detuning caused by metallic surfaces. Evidence role: technical specification; source type: engineering guide. Supports: the specific dimension required for RFID compliance. Scope note: Minimum distance may vary depending on the RFID frequency used.] ↩