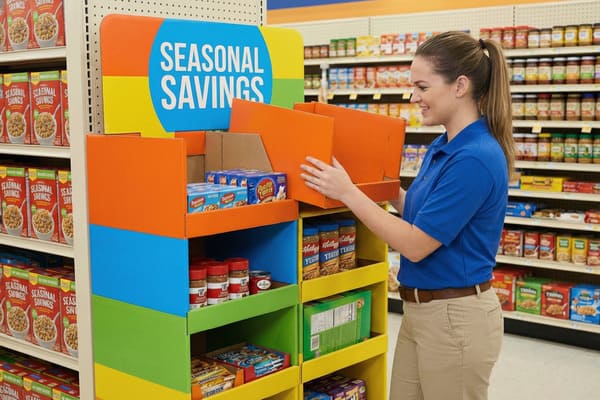
Store layouts change often, and product lines evolve. Retailers and brands alike feel the frustration when a rigid display stand becomes obsolete because the package size changed slightly or the store manager wants to move it.
Yes, floor POP displays can be adjusted if designed with modular features like moveable shelves or variable headers. Custom structural engineering allows retailers to adapt the unit for different product heights or seasonal promotions without replacing the entire stand.

This flexibility is crucial for saving costs and extending the life of your marketing assets. Let us look into the specific details of display types and measurements to understand how this works.
What is the difference between POS and POP displays?
Many business owners use these terms interchangeably, but they serve different strategic roles in the retail environment. Knowing the difference helps you budget your marketing spend more effectively.
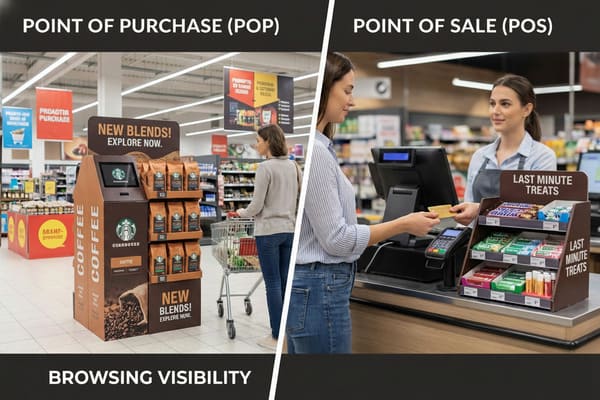
POP (Point of Purchase) refers to displays placed anywhere in the store to attract attention, while POS (Point of Sale) is specifically located at the checkout counter. POP focuses on browsing visibility, whereas POS targets impulse buys right before the transaction occurs.
Strategic Placement and Functionality
Understanding the distinction between Point of Purchase1 (POP) and Point of Sale2 (POS) is vital for manufacturing the right structure. The "Point of Purchase" is a macro concept. It covers the entire retail space where customers decide to buy. These displays are usually larger, freestanding floor units placed in aisles or at the ends of gondolas (endcaps). They need to be robust. We often use double-wall corrugated board (like BC-flute) for these because they hold more inventory. For example, if you are selling a large item like a crossbow or a bulk food item, a POP floor display provides the square footage needed to educate the customer and tell a brand story. The customer is in a browsing mindset here.
On the other hand, "Point of Sale" is the micro location where the money changes hands. This is the register or the checkout queue. Space here is extremely expensive and limited. Displays must be compact, often sitting on the counter (Counter Display Units). The structural requirements are different; we focus on small footprints and high-resolution printing because the customer is standing right next to it. The psychological intent is different too. POS items are usually low-cost "add-ons" like batteries, candy, or string wax. They do not need deep explanations. You need to decide if your product is a destination item (POP) or an impulse item (POS) before we cut the first prototype.
| Feature | POP (Point of Purchase3) | POS (Point of Sale4) |
|---|---|---|
| Location | Aisles, Endcaps, Entryways | Checkout Counter, Cash Register |
| Size | Large (Floor Stands, Pallets) | Small (Counter Units, Clip Strips) |
| Customer Mindset | Browsing, Evaluating, Learning | Transacting, Impulsive, Rushed |
| Structural Material | Heavy-duty Corrugated (BC-flute) | Lighter board (E-flute or B-flute) |
I analyze your product size and price point before suggesting a format. We typically design floor POP units for your main high-ticket inventory to build brand presence, while simultaneously creating smaller, high-margin POS counter displays for your accessories to capture that final dollar at the register.
What's the best way to display Funko Pops?
Collectors are incredibly particular about the condition of the box, not just the figure inside. If you display these incorrectly, you risk damaging the packaging and losing sales from serious buyers.
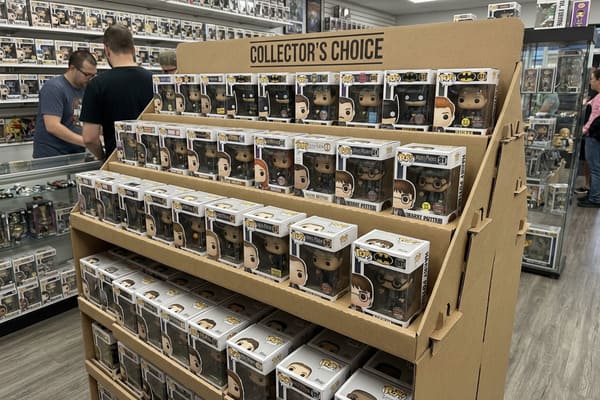
The best way to display Funko Pops is using tiered cardboard shelving or stackable PDQ trays that maintain box integrity while maximizing visibility. These displays should feature custom cutouts to prevent tipping and allow collectors to view the character and the box art simultaneously.
Maximizing Visibility for Collectibles
When we design displays for collectibles like Funko Pops, the structural engineering focuses on "Mint Condition5" preservation. A standard floor shelf might sag under weight, causing boxes to slide and corners to crush. This is unacceptable for collectors. The best approach is a tiered design, often called a "stadium style" display. This structure ensures that the products in the back row are elevated above the front row. We calculate the rise of each tier based on the standard 6.4-inch height of a Funko box so that the character's face and the box number are visible on every level.
Another critical factor is the "lip" or front edge of the shelf. If it is too high, it blocks the name of the figure. If it is too low, the boxes tumble forward when a customer bumps the display. We use precise CNC cutting to create a low-profile retaining edge that holds the box securely without obscuring the artwork. Lighting is also a factor. Dark cardboard can make the inner shelves look shadowy. We often recommend using a white semi-gloss finish (CCNB paper) on the interior structural walls to reflect overhead store light onto the products. This makes the boxes pop visually without needing expensive battery-powered LEDs. The material choice here is usually a sturdy B-flute which offers a smooth printing surface for branding but is strong enough to prevent any shelf bowing.
| Method | Pros | Cons |
|---|---|---|
| Tiered Shelving6 | Excellent visibility for all rows; Premium look | Uses more floor space depth |
| Stackable PDQ Trays7 | Modular; easy to restock; fits on standard retail shelves | Lower boxes can be crushed if cardboard is weak |
| Hang Tabs/Clip Strips | Saves shelf space; good for blister packs | Not suitable for boxed figures (damages packaging) |
I always check the prototype dimensions against your actual packaging before mass production. My team uses precise cutting tables to ensure your boxes fit snugly without damage, and we test the shelf strength to guarantee your collectors see a pristine product every time.
What is the height of the retail outlet eye level display?
You want your product to be the first thing a shopper sees. Understanding the exact measurement of the "eye level" zone is critical for capturing that initial attention.
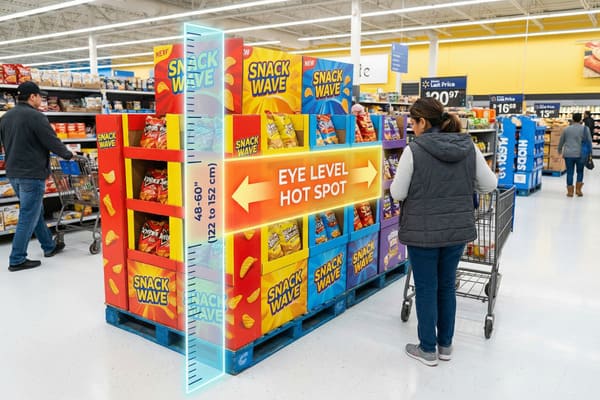
The standard retail eye level falls between 48 and 60 inches (122 to 152 cm) from the floor. This zone is considered the "hot spot" for sales because it aligns with the natural gaze of an average adult shopper, generating the highest engagement rates.
The Ergonomics of Shopper Engagement
In the display industry, we operate on the rule that "eye level is buy level8." However, this is not a single static number. It is a range. For the average adult consumer in North America, the gaze naturally falls around 50 to 55 inches off the ground. When we design a floor display, we map out the "real estate" on the cardboard structure. The header card (the top billboard part of the display) usually sits above this, around 60 to 70 inches, to act as a beacon from a distance. But the primary product—the hero item you want to move the most volume of—must sit in that 48 to 60-inch window.
If you place your best product too low, say at 30 inches, the shopper has to look down. This requires effort and decreases the likelihood of a casual notice. Conversely, if you are selling products for children (like toys), the "eye level" shifts dramatically downward to about 30 to 40 inches. We also have to consider the retailer's specific rules. Stores like Walmart or Costco have strict height limits (often 55 to 60 inches total height) to ensure store security cameras have a clear line of sight across the aisles. If we build a tower that is 72 inches high, it might get rejected by the store compliance team regardless of how good it looks. We also use 3D renderings to simulate how the display looks from 10 feet away versus 2 feet away to ensure the branding is readable at eye level from multiple distances.
| Zone | Height Range | Effectiveness | Best Use |
|---|---|---|---|
| Stretch Level9 | 60"+ (152cm+) | Low | Branding, Header Cards, Lightweight stock |
| Eye Level10 | 48" – 60" (122-152cm) | High (The Hot Spot) | High-margin items, New arrivals, Bestsellers |
| Touch Level | 30" – 48" (76-122cm) | Medium | Standard inventory, heavy items |
| Stoop Level | Below 30" (76cm) | Low | Bulk items, Destination purchases, Value packs |
I design headers specifically to hit this 50-inch mark effectively while keeping the total structure compliant with retailer limits. We adjust the base height of our floor displays so your primary branding and key products sit exactly where the customer looks, maximizing your sell-through rate without guessing.
What is the best height to showcase a product?
Seeing the product is one thing, but physically interacting with it is another. The height must be comfortable for lifting and examining the item.
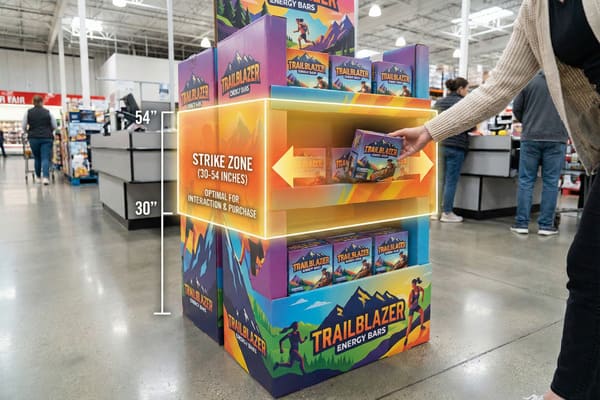
The optimal height to showcase a product is between 30 inches and 54 inches off the ground. This "strike zone" requires the least amount of physical effort for shoppers to reach, grab, and examine the item, significantly increasing the likelihood of a purchase.
Optimizing Vertical Real Estate
While "eye level" is about visibility, the "showcase height" is about accessibility and physics. This is the zone where the human arm reaches out most naturally. We call this the "Strike Zone11." If a product is placed too high, a shorter customer cannot reach it safely. If it is too low, a taller customer or an older customer might be reluctant to bend down. This is especially important for heavier items. For example, if you are displaying hunting gear or packaged electronics, these boxes have weight. You never want a heavy box placed at 60 inches high; if a customer tries to pull it down and slips, it is a safety hazard.
Therefore, we place heavy or bulky items in the lower "Touch Level12" zone (30-40 inches). This lowers the center of gravity of the cardboard display, making it more stable, and allows the customer to lift with their legs, not their back. For lighter items, the 40-54 inch range is perfect. We also have to consider the "pack out" or how much product fits on the display. Sometimes, to get the product to the right height, we use a "false bottom" or a cardboard riser in the base. This lifts the bottom shelf up so even the lowest product is not sitting directly on the dirty floor. We use structural supports inside this base to ensure it can hold the weight of the product stack without collapsing during the weeks it sits on the retail floor.
| Vertical Zone | Height | Reachability | Best Product Weight |
|---|---|---|---|
| Upper Shelf | 50" – 54" | Easy reach, eye contact13 | Light to Medium |
| Middle Shelf | 40" – 50" | Perfect ergonomic reach14 | Medium |
| Lower Shelf | 30" – 40" | Easy reach, stable lifting | Heavy / Bulky |
| Base / Floor | 0" – 10" | Hard to reach (avoid) | Very Heavy / Storage only |
We calculate the center of gravity for every display we manufacture. If you are selling heavy gear, I reinforce the lower shelves with metal support bars or double-wall cardboard and angle the upper tiers, ensuring customers can safely lift your product while keeping the display stable.
Conclusion
Adjusting floor displays requires balancing structural integrity with shopper ergonomics. Whether you need modular shelves for different package sizes or a specific height to hit the visual "hot spot," the key is planning ahead. I can help you navigate these technical details to ensure your product stands out and stays secure.
Exploring this link will deepen your understanding of how POP influences customer buying decisions and retail strategies. ↩
This resource will provide insights into the significance of POS in enhancing customer satisfaction and driving sales. ↩
Discover how Point of Purchase displays can enhance customer engagement and boost sales. ↩
Learn about the critical functions of Point of Sale systems and their impact on retail efficiency. ↩
Understanding Mint Condition is crucial for collectors to maintain the value and integrity of their collectibles. ↩
Explore this link to understand how Tiered Shelving can enhance product visibility and improve store aesthetics. ↩
Discover the advantages of Stackable PDQ Trays for easy restocking and maximizing shelf space. ↩
Understanding this concept can significantly enhance your display strategies, leading to better shopper engagement and sales. ↩
Exploring Stretch Level can provide insights into effective branding techniques that attract customer attention and enhance brand recognition. ↩
Understanding Eye Level can significantly enhance product visibility and sales, making it a crucial aspect of retail strategy. ↩
Understanding the Strike Zone can enhance product visibility and accessibility, improving customer experience and sales. ↩
Exploring the Touch Level helps in creating safer and more effective displays, ensuring customer comfort and safety. ↩
Exploring the significance of easy reach and eye contact can improve user interaction and product visibility. ↩
Understanding perfect ergonomic reach can enhance your shelving design for better accessibility and comfort. ↩


