Вам нужно построить торговый зал, который действительно продает товары, а не просто хрупкую картонную коробку. Я вижу, как бренды тратят тысячи на конструкции, которые разрушаются еще до того, как попадут на полки.
Изготовление картонной подставки требует обеспечения структурной целостности конструкции, выбора подходящего сорта гофрированного картона и соблюдения точных допусков при вырубке. Необходимо найти баланс между визуальным отвлечением внимания и физическими свойствами конструкции, обеспечив ее устойчивость при транспортировке, а также соответствие строгим требованиям розничных продавцов к размещению на полу и безопасному доступу для покупателей.
Давайте разберем физические аспекты доставки этих товаров на полки без списаний средств или обрушения стеллажей.
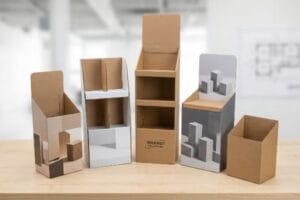
Что такое гофрированный дисплей?
Обычная картонная коробка удерживает воздух; розничный продавец же удерживает имидж вашего бренда под огромным давлением.
Гофрированная витрина — это высокотехнологичная торговая конструкция, изготовленная из гофрированного картона для размещения, демонстрации и выдачи товаров. В ней используются специальные геометрические методы складывания, позволяющие превратить плоские, легкие листы в высокопрочные, несущие конструкции, способные выдерживать транспортировку по цепочке поставок и суровые условия торгового зала.
Знать, что это такое на бумаге, — это хорошо, но для создания системы, которая выдержит напряженные выходные, требуется более глубокий анализ.
Почему стандартный гофрированный картон не оправдывает себя в розничной торговле
Многие графические дизайнеры просто запрашивают стандартные переработанные материалы, чтобы достичь целей в области устойчивого развития. Они считают, что любой толстый картон без проблем выдержит несколько бутылок шампуня в течение месячной рекламной кампании.
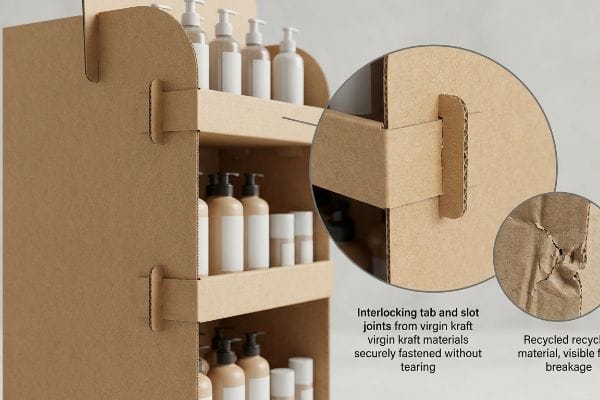
Я вижу, как эта ловушка попадается даже опытным командам по закупкам. Клиент заказывает 100% переработанный картон, чтобы сэкономить несколько центов на единицу продукции. Но когда я наблюдаю, как продавец изо всех сил пытается вставить сложный язычок в прорезь, я слышу отчетливый, удручающий звук трения волокон необработанного картона. Переработанный картон теряет свою механическую прочность, превращая запирающие механизмы в кашу. Я решаю эту проблему, строго требуя использования первичного крафт-бумаги в критически важных несущих соединениях, обеспечивая надежную фиксацию язычков с первой попытки, экономя продавцу 15 минут утомительной сборки и сохраняя витрину в вертикальном положении.
| Распространённая ошибка новичков | Профессиональное решение | Преимущества для торговых площадей |
|---|---|---|
| Используется 100% переработанный тестовый слой | Крафт-бумага из первичного сырья для несущих соединений | Предотвращает отрыв фиксирующих защелок |
| Игнорируя направление волокон | Вертикальное выравнивание канавки | Предотвращает деформацию основания |
| Предположим, что весь картон одинаков | Указание предельных значений испытания на сжатие кромки (ECT) | Выдерживает большие нагрузки от продукции |
Я никогда не позволяю клиентам слепо доверять типовым спецификациям материалов. Укажите точный сорт бумаги, необходимый для вашей геометрии, иначе ваша рекламная кампания рухнет прямо в проходе.
🛠️ Рабочий стол Харви: Ваши конструктивные элементы рвутся еще до того, как товар попадает на полку? 👉 Позвольте мне проверить ваши технические характеристики материалов ↗ — Прямой доступ к моему рабочему столу. Никакого автоматического спама с рекламой, обещаю.
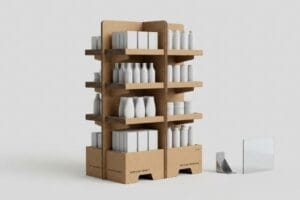
Что такое выставочный стенд?
Это не просто место для хранения товаров. Это продуманный пространственный инструмент, призванный изменить покупательские привычки.
Витрина — это отдельное торговое оборудование, используемое для того, чтобы выделить, организовать и подчеркнуть физические товары, разместив их вне обычных торговых рядов. Размещая товары непосредственно в местах с высокой проходимостью, эти стенды максимизируют импульсивные покупки, обеспечивая при этом единообразие фирменного стиля и соблюдение строгих ограничений планировки магазина.
Но отдельно стоящая витрина бесполезна, если покупатели проходят мимо, не замечая её.
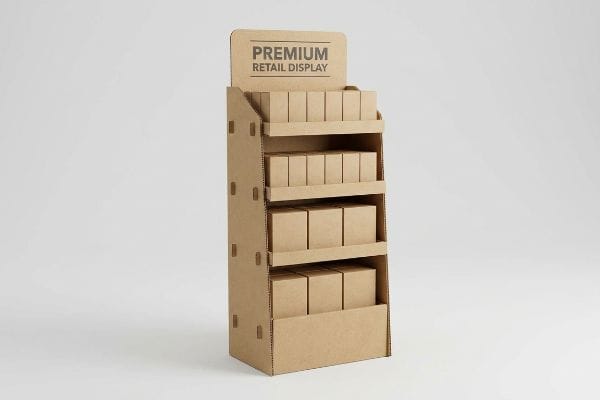
Тепловая карта роста человека для отдельно стоящих модулей
Бренды часто одобряют красивые 3D-визуализации, где их основной логотип и наиболее прибыльные элементы симметрично расположены по всей конструкции. Они рассматривают объект как плоский рекламный щит, а не как физический объект, взаимодействующий с человеческой биологией¹ .
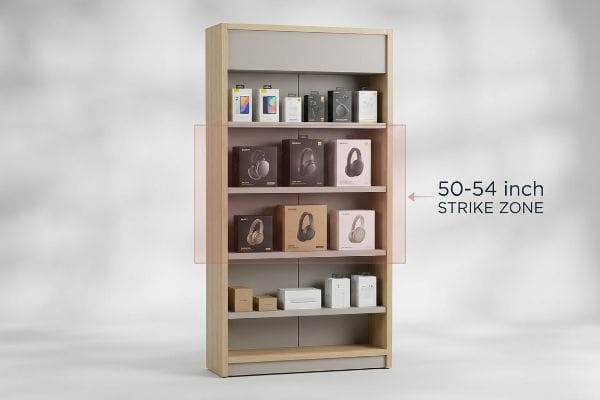
Я вижу, как красивые рекламные кампании терпят неудачу из-за того, что главный товар размещен слишком низко. Однажды управляющий магазином показал мне витрину, где ключевые товары находились всего в 76,2 см от пола, заставляя покупателей неудобно наклоняться, чтобы прочитать этикетки. Я немедленно переношу такие дизайны в то, что я называю «зоной притяжения» 127-137,1 см2-м файле САПР (системы автоматизированного проектирования). Поднятие товаров с самой высокой маржой непосредственно на линию естественного взгляда создает мгновенное визуальное трение, без труда увеличивая количество покупок3 и предотвращая превращение нижних полок в пыльное кладбище.
| Распространённая ошибка новичков | Профессиональное решение | Преимущества для торговых площадей |
|---|---|---|
| Размещайте ключевые товары на нижних полках | Используя зону удара 50-54 дюйма,4 | Увеличивает частоту импульсивных хватаний |
| Обращаться с устройством как с плоским плакатом | Наклон полок вверх на 15 градусов5 | Обеспечивает высокую читаемость этикеток |
| Симметричное размещение товаров общего назначения | Группировка большого объема в основании | Снижает физический центр тяжести6 |
Я всегда в первую очередь ориентируюсь на эргономику при проектировании. Если для взаимодействия с устройством пользователю приходится наклоняться или щуриться, вы уже потеряли потенциальную продажу.
🛠️ За столом Харви: Ваш флагманский продукт скрывается в тени розничной торговли? 👉 Запросите аудит зоны 3D-поиска ↗ — Скачайте безопасно. Мой почтовый ящик открыт, если у вас возникнут вопросы позже.
Что такое POSM-стенд?
Проектирование кассовой зоны кардинально отличается от проектирования основного прохода в торговом зале. Пространственные расчеты мгновенно меняются.
Стенд для размещения POSM-материалов — это локализованный маркетинговый элемент, размещаемый рядом с кассовыми аппаратами для стимулирования немедленных покупок в последний момент. Эти компактные конструкции, обозначающие POSM-материалы (Point of Sale Materials — материалы для точек продаж), должны строго соответствовать ограничениям по вылету вперед, установленным в соответствии с требованиями ADA, и ограничениям по глубине прилавка, обеспечивая беспрепятственный доступ без нарушения стандартных кассовых операций.
Получить разрешение на размещение торговой точки в зоне касс крайне сложно из-за строгих правил территориального планирования.
Как справиться с ограничениями в сфере соблюдения нормативных требований и диктатурой со стороны розничных продавцов
Торговые компании часто предлагают масштабируемый дизайн, при котором большой торговый стенд можно просто уменьшить на 50%, чтобы использовать его в качестве прилавка. Они игнорируют строгие юридические и логистические правила, регулирующие эти отдельные зоныв розничной торговле США.
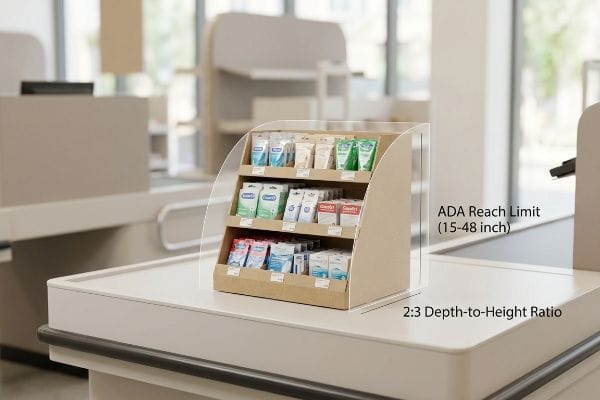
Это распространённая ловушка, в которую попадают даже опытные покупатели. Однажды я наблюдал, как клиент пытался установить уменьшенную напольную витрину на стандартную аптечную стойку, полностью закрывая обзор кассиру и нарушая требования Закона об американцах с ограниченными возможностями (ADA) о допустимом расстоянии до кассы от 15 до 48 дюймов (38,1-121,9 см)⁸. Менеджер магазина немедленно отклонил поставку, выбросив шатающиеся витрины в подсобку. Я решаю эту проблему, полностью разделяя инженерные процессы, создавая лотки для кассовых аппаратов со строгим соотношением глубины к высоте 2:3⁹,гарантируя, что они плотно прилегают к кассе, не опрокидываясь, мгновенно проходя проверки на соответствие требованиям и обеспечивая себе премиальное размещение.
| Распространённая ошибка новичков | Профессиональное решение | Преимущества для торговых площадей |
|---|---|---|
| Уменьшение размеров напольных модулей для прилавков | Разработка пользовательских POS-файлов | Проходит проверку на соответствие требованиям управляющего магазином |
| Игнорирование правовых норм, определяющих допустимость применения закона | Крепление к окну стандарта ADA 15-48 дюймов10 | Обеспечивает доступность для инвалидных колясок |
| Слишком мелкое основание | Применяя соотношение глубины к высоте 2:311 | Предотвращает опрокидывание подставки вперед |
Я отказываюсь использовать подход «подгонки под размер» для кассовых аппаратов. Рассматривайте прилавок как строго регламентированную зону премиум-класса и разрабатывайте математические расчеты специально для нее.
🛠️ Стол от Харви: Боитесь, что ваш прилавок будет отклонен менеджерами магазина? 👉 Проверьте соответствие вашего дизайна требованиям ↗ — Никаких бланков, которые приводят к бесконечным звонкам отдела продаж. Только чистая выгода.
Какой код ТН ВЭД используется для выставочных стендов?
Даже самый продуманный дизайн ничего не значит, если ваша логистическая команда неправильно маркирует коммерческий счет и теряет прибыль на таможне.
Код ТН ВЭД для выставочных стендов обычно равен 4823.90 и охватывает различные изделия из бумаги или картона. Однако для определения правильной тарифной классификации необходимо проанализировать состав основного материала, поскольку изделия из смешанных материалов с использованием металлических кронштейнов или пластиковых крючков могут облагаться совершенно другими, более высокими таможенными пошлинами.
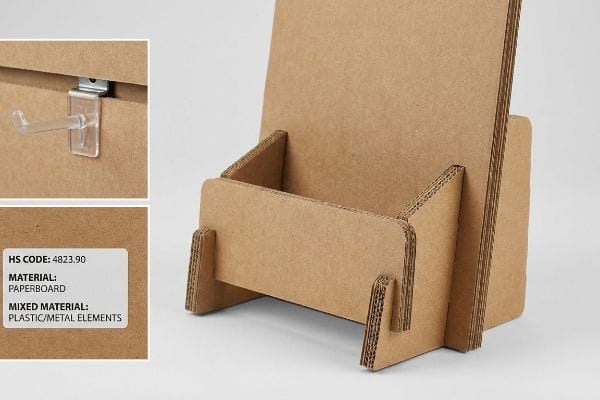
Для выбора правильного кода категории необходимо понимать, как сотрудники таможни оценивают физические материалы.
Тарифная стратегия для смешанных материалов
Координаторы цепочки поставок часто по умолчанию используют общий код12 при импорте товаров, содержащих несколько типов материалов. Они предполагают, что таможенный брокер автоматически определит наиболее экономически выгодный путь.
Опора на стандартные категории — это огромная ошибка. У меня был партнёр, который классифицировал свои картонные стеллажи по жёсткому коду для розничной торговли только потому, что в них было несколько крошечных пластиковых крючков для подвешивания. Когда груз прибыл, таможня отметила металлические и пластиковые элементы, что привело к неожиданному повышению пошлины на 25%¹³ , которое свело на нет всю прибыль. Я проверяю спецификацию материалов (BOM) перед отправкой, чётко указывая, что стеллаж на 95% состоит из гофрированного картона, оптимизируя код для законного минимизирования таможенных пошлин и экономя тысячи долларов на ненужных пограничных налогах.
| Распространённая ошибка новичков | Профессиональное решение | Преимущества для торговых площадей |
|---|---|---|
| Использование стандартных кодов мебели | Использование конкретных категорий картона14 | Снижает процент импортных пошлин |
| Скрытые крючки из смешанных материалов | Документирование точного состава материалов15 | Предотвращает задержки при пограничном досмотре |
| Позволить брокерам гадать о содержимом | Предоставление подробной документации по спецификации материалов (BOM)16 | Обеспечивает предсказуемость затрат на доставку |
Я никогда не позволяю клиентам оставлять классификацию тарифов на волю случая. Строго контролируйте свою документацию по материалам, чтобы защитить рентабельность инвестиций в зарубежное производство.
🛠️ За столом Харви: Вы переплачиваете импортные налоги из-за стандартных коммерческих счетов-фактур? 👉 Запросите проверку спецификации материалов для логистики ↗ — Прямой доступ к моему рабочему месту. Никакого автоматического спама с рекламой, обещаю.
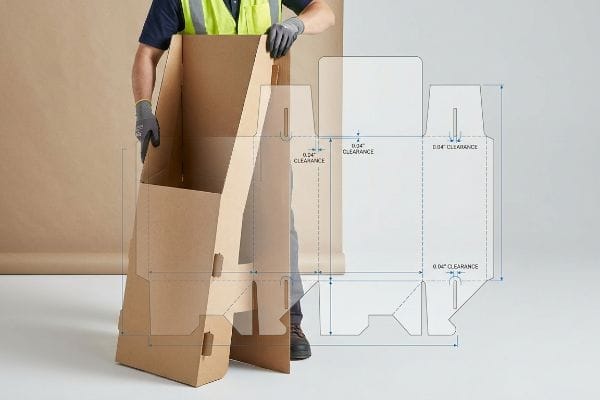
Как собрать выставочный стенд?
Даже самая красиво оформленная рекламная кампания бесполезна, если складская команда не может собрать её достаточно быстро.
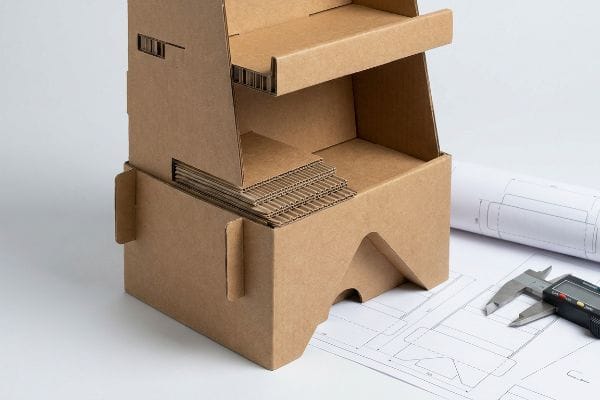
Для сборки подставки необходимо логично согнуть предварительно размеченные гофрированные панели в их несущую геометрическую форму, надежно зафиксировав соединительные выступы в предназначенных для этого пазах с компенсацией толщины. Следование визуальной инструкции гарантирует плотное прилегание внутренних перегородок, обеспечивая максимальную структурную целостность без использования скотча или клея.
Но знания теории недостаточно, когда запускаются машины и меняется влажность.
Почему теоретические схемы вырубки оказываются неэффективными на заводе
Конструкторы и инженеры-конструкторы в офисах с контролируемым микроклиматом часто устанавливают допуски на пазы, исходя из абсолютной толщины плиты в сухом состоянии. Они предполагают, что идеально выточенный механизм зацепления будет плавно скользить по упаковочной линии .
Установить один дисплей в лабораторных условиях несложно, но вот суровая реальность, когда вы отправляете 500 таких дисплеев во влажный прибрежный регион. На моем предприятиия регулярно наблюдаю, как плоские упаковки впитывают влагу из окружающего воздуха¹⁸,что приводит к физическому разбуханию пористых волокон. Прорезь, которая идеально соответствовала размерам на экране, внезапно становится на 0,03 дюйма (0,76 мм) уже, чем нужно. Затем команда упаковщиков вынуждена агрессивно сжимать детали вместе, разрывая верхний слой и разрушая визуальное оформление бренда. Автоматически закладывая определенный буфер влажности в программное обеспечение CAD¹⁹,я добавляю дополнительные 0,04 дюйма (1,01 мм) зазора в приемные прорези, обеспечивая сокращение времени сборки на 45 секунд на единицу и экономя клиентам огромные средства на оплату труда.
| Распространённая ошибка новичков | Профессиональное решение | Преимущества для торговых площадей |
|---|---|---|
| Проектирование пазов только для сухой доски | Разработка буфера для предотвращения набухания под воздействием влаги | Обеспечивает беспрепятственную сборку упаковочного оборудования |
| Игнорируя влажность воздуха в складском помещении | Испытание штангенциркуля в условиях высокой влажности | Предотвращает разрывы изображения на поверхности |
| Опора на объемные руководства | Использование визуальных 3D-руководств по сборке | Сокращает время на обучение складских работников |
Я закладываю физическую реальность в свои цифровые файлы. Если в вашем проекте не учитывается разбухание бумаги, вы расплачиваетесь за замедление сборки и поломку деталей.
🛠️ Совет от Харви: Не позволяйте двухмиллиметровому структурному дефекту испортить запуск продаж в 500 магазинах. 👉 Пришлите мне файл с чертежами ↗ — Я проверю расчеты, прежде чем вы потратите бюджет на массовое производство.
Заключение
Вы можете выбрать поставщика, который игнорирует разбухание бумаги при комнатной температуре, но когда эти ячейки формата 32ECT физически расширяются во влажном складе, возникающее трение при сборке замедлит линию упаковки примерно на 30% и приведет к дорогостоящей ручной доработке. Более 500 бренд-менеджеров используют мой контрольный список для допечатной подготовки, чтобы избежать именно этих фатальных ошибок на ранних этапах. Перестаньте гадать о допусках окружающей среды и позвольте мне лично проверить ваши структурные файлы с помощью моего бесплатного аудита высечки ↗, чтобы выявить эти скрытые точки трения до начала печати.
«Уровень глаз — это уровень покупки — Принципы визуального мерчандайзинга…», https://medium.com/@giaphualihua/eye-level-is-buy-level-the-principles-of-visual-merchandising-and-shelf-placement-5f2fd8f7f298. [Исследования в области розничной эргономики и визуального мерчандайзинга показывают, как рост человека и линия обзора влияют на взаимодействие с физическими витринами]. Роль доказательства: техническая основа; тип источника: академическое исследование или стандарт розничной индустрии. Подтверждает: утверждение о том, что витрины должны учитывать биологические факторы. Примечание к области исследования: акцент на отдельно стоящих торговых витринах. ↩
«Дизайн торговых помещений для эффективной выкладки товаров и организации потока покупателей», https://www.business.qld.gov.au/industries/manufacturing-retail/retail-wholesale/retail-displays. [Отраслевые стандарты визуального мерчандайзинга и эргономические исследования среднего уровня глаз человека обычно указывают на диапазон 50-54 дюймов как на оптимальную зону для видимости товара]. Роль доказательства: техническая спецификация; тип источника: руководство по дизайну торговых помещений. Подтверждает: оптимальную высоту размещения товаров. Примечание об объеме исследования: может незначительно отличаться в зависимости от целевой аудитории. ↩
«РАЗМЕЩЕНИЕ БРЕНДА И ВЫБОР ПОТРЕБИТЕЛЯ: АНАЛОГ В МАГАЗИНЕ…», https://pmc.ncbi.nlm.nih.gov/articles/PMC2741065/. [Исследования поведения потребителей подтверждают, что товары, размещенные на уровне глаз, имеют значительно более высокий уровень вовлеченности и продаж по сравнению с товарами, размещенными на более низких полках]. Роль доказательства: эмпирические данные; тип источника: исследование психологии потребителей. Подтверждает: эффективность «зоны внимания». Примечание по области применения: в основном относится к товарам импульсивного спроса и товарам с высокой маржой. ↩
«Как использовать витрины для импульсивных покупок: руководство для планировщиков магазинов – SPC Retail», https://spc-retail.com/how-to-use-impulse-displays-a-guide-for-store-planners/[Отраслевые стандарты розничной торговли определяют конкретные диапазоны высоты, часто называемые «зонами притяжения», которые соответствуют среднему уровню глаз человека для максимизации импульсивных покупок]. Роль доказательства: техническая спецификация; тип источника: руководство по розничной торговле. Подтверждает: оптимальное размещение товара для импульсивных покупок. Примечание по области применения: целевая высота может варьироваться в зависимости от среднего роста населения. ↩
«Максимизация привлекательности на полке: стратегии для выделяющейся маркировки продукта», https://mammothpackaging.com/maximizing-label-shelf-appeal/. [Эргономические исследования визуального восприятия и углов чтения показывают, что небольшой наклон вверх улучшает читаемость этикеток продукта для потребителей, стоящих на полке]. Роль доказательства: стандарт дизайна; тип источника: эргономическое исследование. Подтверждает: улучшенная читаемость этикетки. Примечание по области применения: специфично для отдельно стоящих устройств. ↩
«Для оптимального распределения веса в прицепах общепринятое эмпирическое правило гласит…», https://www.instagram.com/reel/CyoJK0BNJG3/. [Принципы строительной инженерии и физики гласят, что размещение самой тяжелой массы в самой нижней точке конструкции повышает ее устойчивость к опрокидыванию]. Роль доказательства: физический принцип; тип источника: инженерный справочник. Поддержка: структурная безопасность отдельно стоящих конструкций. Примечание к области применения: общее применение физики центра масс. ↩
«Стандарты доступности ADA – Access-Board.gov», https://www.access-board.gov/ada/. [Авторитетные руководства ADA и стандарты безопасности розничной торговли устанавливают юридические требования, которые отличают напольные витрины от настольных]. Роль доказательства: юридическая проверка; тип источника: нормативные руководства. Подтверждает: утверждение о том, что различные зоны размещения товаров в розничной торговле регулируются конкретными правовыми нормами. Примечание об объеме: ограничено юрисдикциями розничной торговли США. ↩
«Стандарты ADA для доступного дизайна, Раздел III, Правило 28 CFR…», https://www.ada.gov/law-and-regs/design-standards/1991-design-standards/. [Официальные руководящие принципы ADA определяют максимальную и минимальную высоту для беспрепятственного доступа вперед, чтобы обеспечить доступность для людей в инвалидных колясках]. Роль доказательства: техническая спецификация; тип источника: государственное регулирование. Подтверждает: соответствие нормативным требованиям размещения дисплея. Примечание об объеме: относится к измерениям доступа вперед. ↩
«Как соотношение высоты и глубины влияет на устойчивость стеллажей для хранения – RMI», https://www.rmiracksafety.org/2021/05/20/how-height-to-depth-ratio-contributes-to-overall-storage-rack-stability/. [Принципы центра тяжести и статического равновесия в промышленном проектировании поддерживают определенные соотношения сторон для предотвращения опрокидывания легких конструкций]. Роль доказательства: инженерный принцип; тип источника: руководство по проектированию. Поддерживает: структурную устойчивость лотков для выдачи. Примечание по области применения: устойчивость зависит от распределения содержимого на витрине. ↩
«Руководство по стандартам доступного дизайна ADA 2026», https://rimkus.com/article/ada-standards-accessible-design-compliance-guide/. [Закон об американцах с ограниченными возможностями (ADA) устанавливает конкретные требования к дальности действия подвижных частей и поверхностей для обеспечения доступности для пользователей инвалидных колясок]. Роль доказательства: проверка; тип источника: нормативный стандарт. Подтверждает: соответствие законам о доступности. Примечание об области применения: относится конкретно к федеральным руководящим принципам США. ↩
«Как выбрать высоту для торгового стенда?», https://popdisplay.me/how-to-choose-your-retail-display-height/. [Стандарты строительной инженерии для отдельно стоящих стендов рекомендуют определенные соотношения высоты основания для поддержания низкого центра тяжести и предотвращения опрокидывания]. Роль доказательства: техническая проверка; тип источника: инженерная спецификация. Опоры: Физическая устойчивость и безопасность стендов. Примечание по области применения: Соотношение может меняться в зависимости от веса продукта и плотности материала. ↩
«Вы когда-нибудь хотели узнать о классификации мебели: Раздел 9403», https://www.dhs.gov/medialibrary/assets/video/57889. [В отраслевых отчетах о соблюдении таможенных правил обычно указывается частота использования импортерами широких категорий классификации для сложных изделий из смешанных материалов]. Роль доказательства: подтверждающие эмпирические данные; тип источника: отчет о соблюдении торговых правил. Подтверждает: распространенные в отрасли модели неправильной классификации. Примечание: применяется к глобальным тенденциям таможенных проверок. ↩
«Тарифная классификация лотков для демонстрации из гофрированного картона…», https://rulings.cbp.gov/ruling/n322224. [Тарифные таблицы таможни и данные по контролю за соблюдением торговых правил свидетельствуют о различиях в ставках пошлин при переклассификации продукции из бумажной (HS 4823) в металлическую или пластиковую, особенно в рамках тарифов, введенных в условиях торговой войны, таких как Раздел 301]. Роль доказательства: фактическое подтверждение; тип источника: база данных по торговому регулированию. Подтверждает: утверждение о том, что изменения в составе материалов могут привести к значительному увеличению пошлин. Примечание: Точные процентные показатели различаются в зависимости от страны происхождения и действующих торговых договоров. ↩
«Гармонизированная тарифная сетка», https://hts.usitc.gov/. [Официальные таможенные тарифные сетки показывают, что для определенных категорий материалов, таких как картон, часто действуют более низкие ставки пошлин, чем для общих категорий мебели]. Роль доказательства: фактическая проверка; тип источника: официальная тарифная сетка. Подтверждает: снижение импортных издержек за счет точного кодирования. Примечание: ставки пошлин различаются в зависимости от страны-импортера. ↩
«ИНФОРМАЦИОННЫЙ ЛИСТ: Задержки коммерческого транспорта вдоль границы Техаса и…», https://www.cbp.gov/newsroom/national-media-release/fact-sheet-commercial-traffic-delays-along-texas-border-and. [Таможенные правила требуют подробного указания состава материалов для товаров смешанного назначения, чтобы обеспечить правильную классификацию и избежать ручной проверки грузов]. Роль доказательства: процедурная проверка; тип источника: руководство по таможенным правилам. Поддержка: предотвращение задержек в логистике. Примечание об объеме применения: эффективность зависит от строгости региональных таможенных органов. ↩
«Стоимость доставки: полное руководство по расчету общей стоимости импорта и…», https://www.finaleinventory.com/blog/guides/landed-cost/. [Подробная спецификация материалов (BOM) позволяет точно рассчитать пошлины и налоги, исключая вариативность, связанную с оценками брокера]. Роль подтверждения: техническая проверка; тип источника: руководство по логистике. Поддерживает: финансовую предсказуемость стоимости доставки. Примечание об объеме работ: требуется согласование между производителем и брокером. ↩
«Полное руководство по допускам размеров гофрокартонных коробок – Upack», https://www.upack.in/blog/post/complete-guide-on-corrugated-box-dimension-tolerance?srsltid=AfmBOooBCI5YYRm4zLFHTgvyX0fDL3jxwtcjAxLuLb4128SspSE68kD4. [Авторитетный источник по проектированию упаковки объяснил бы, как толщина материала изменяется в зависимости от влажности окружающей среды и почему полагаться на абсолютную толщину в сухом состоянии приводит к сбоям при сборке]. Роль доказательства: техническая проверка; тип источника: инженерное руководство; Подтверждает: утверждение о том, что теоретические допуски часто не выполняются в реальных условиях; Примечание об области применения: относится конкретно к гофрокартону. ↩
«Влияние относительной влажности на прочность на сжатие…», https://open.clemson.edu/all_theses/3225/. [Исследования в области материаловедения, посвященные целлюлозным волокнам, показывают, что гофрированный картон гигроскопичен, что приводит к его расширению в условиях высокой влажности]. Роль доказательства: Техническая проверка; тип источника: Журнал по материаловедению или стандарт упаковки. Подтверждает: Физическую причину сужения пазов. Примечание к области применения: Скорость расширения зависит от удельной плотности (GSM) и покрытия картона. ↩
«Что такое относительная влажность и как она влияет на ваши коробки? – Billerud», https://www.billerud.com/products/packaging-materials/corrugated-materials/knowledge-center/humidity. [В рекомендациях по проектированию упаковки указаны допустимые отклонения при создании вырубных форм для учета различий в материалах и колебаний окружающей среды]. Роль доказательства: Подтверждение отраслевой практики; тип источника: Руководство по проектированию упаковки. Подтверждает: Методологию поддержания эффективности сборки. Примечание об объеме: Конкретные значения отклонений обычно определяются путем тестирования материалов. ↩