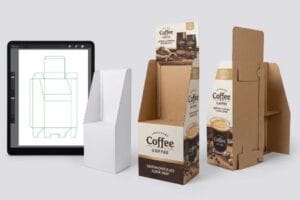
アートワークは完成し、3Dレンダリングにも承認が入りましたが、量産を開始する前に、構造ファイルを物理的な製造ツールに変換する必要があります。.
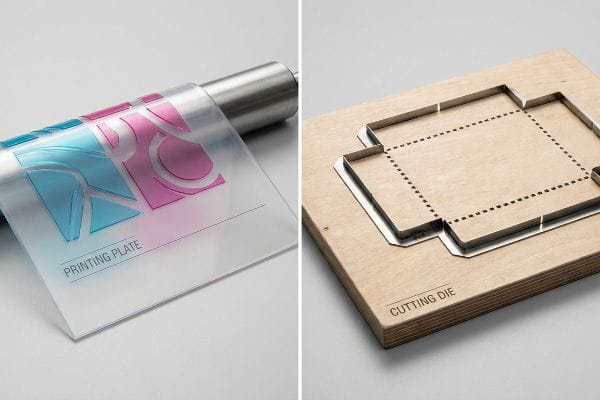
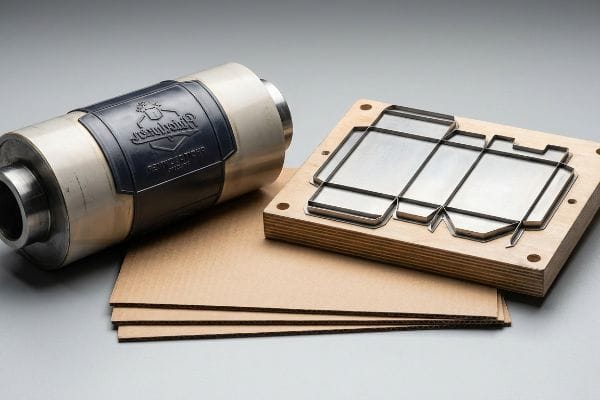
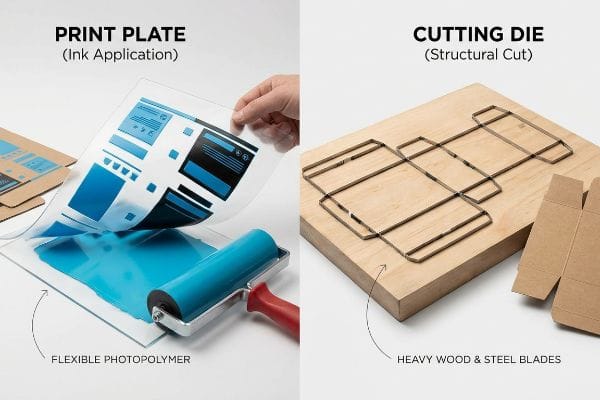
印刷版と型抜きは、段ボール製造において不可欠な物理的ツールです。印刷版は特定のインクの色を段ボールの表面に転写し、特注の鋼製型抜きは、印刷されたシートを物理的に打ち抜き、折り目をつけ、切断して、高級小売店での組み立てに適した最終的な構造形状に成形します。.
これら2つの異なる工具が工場現場でどのように相互作用するかを理解することが、完璧な小売ディスプレイと構造的な大惨事の分かれ目となる。.
型抜きと印刷版の違いは何ですか?
これらの工具は同じ生産ラインで一緒に稼働するものの、機械的な機能は全く正反対である。.
型抜きと印刷版の違いは、その物理的な機能にのみあります。印刷版は、液体インクを塗布する柔軟な感光性ポリマーシートであるのに対し、型抜きは、最終的な構造を永久的に切断する鋼鉄製の刃が埋め込まれた重い木製の板です。.
これら2つのツールの物理的な限界を混同すると、大量生産時に高額な誤差が生じる原因となる。.
グラフィックツールと構造ツールの違い
多くのブランドマネージャーは、デジタルPDFが承認されれば、工場は巨大な印刷ボタンを押すだけで済むと思い込んでいます。しかし実際には、従来のリソグラフィーラミネート加工では、全く異なる2種類の物理的な金型を製造する必要があります。印刷機用の薄くて柔軟な版にグラフィックを焼き付ける一方、構造的な型抜き線は厚い木板にレーザーカットされ、そこに鋼鉄製の刃を手作業で打ち込んで固定します。.
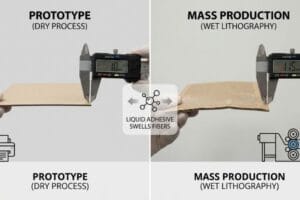
ベテランの調達チームでさえ、新しいアートワークの印刷に古い構造用金型を再利用することでコストを削減しようとすることがよくあります。私は、湿気の多い倉庫に2年間放置されていたカッティングボードに新しいグラフィックを組み合わせたいというクライアントの要望を常に目にします。 多孔質の木材は周囲の湿気を吸収して反り、鋼の刃は錆びて物理 的にずれてしまいます。その劣化した金型を新しい印刷ジョブに適用すると、鈍くなった刃が新しいアートワークをきれいに切断するのではなく引き裂くため、生の紙ボード特有の不快な音が聞こえます。私は、バッチごとに新しい金型プロトコルを強制し、 レーザーで新しい金型を焼き付けて、小売フロアでカミソリのように鋭い エッジと摩擦のない組み立てを保証することで、
| 初心者によくある間違い | プロフィックス | 小売店舗におけるメリット |
|---|---|---|
| 2年前の型抜きダイを再利用 | バッチごとに新しい金型をレーザーで焼き付ける3 | 破れたアート作品を防ぎます |
| 倉庫内の湿度による歪みを無視する | 金型を温度・湿度管理された場所に保管する4 | しっかりと固定できるロックタブを保証します |
| プレートとダイを一つのツールとして扱う | グラフィック予算と構造予算を分離する | 手作業による組み立て時間を30秒短縮5 |
わずかな初期費用を節約するためだけに、品質が劣る錆びた刃で大規模な小売展開を危険にさらすつもりはありません。新しい金型を使用すれば、構造計算が毎回インクと完璧に一致することが保証されます。
🛠️ ハーベイのデスク: 古い工具のせいで、新しいディスプレイの縁がギザギザになったり、組み立てが面倒になったりしていませんか? 👉 工具監査を依頼する ↗ — 私のデスクに直接アクセスできます。自動販売スパムは一切ありませんのでご安心ください。
印刷版は何に使われるのですか?
段ボール板は、実際に折り畳まれる前に、売り場で買い物客の注意を引くような、印象的な視覚効果が必要となる。.
オフセット印刷工程では、印刷版を用いて特定の液体インクを紙や段ボールなどの基材に転写します。各版はシアンやマゼンタといった単一の色チャンネルを分離し、それらを順番に印字することで、高級小売パッケージやダイナミックな店頭ディスプレイ向けの複雑で高解像度のグラフィックを作成します。.
しかし、標準的な4色刷り版だけに頼っていると、紙の原料となる物質の化学的性質を理解していない限り、あっという間にブランド価値を損なうことになりかねません。.
標準CMYKがブランドアイデンティティに不向きな理由
ジュニアデザイナーは通常、工場が明るいデジタル画面に合わせて4つの標準版を出力するだけなので、アートワークファイルをCMYK(シアン、マゼンタ、イエロー、ブラック)のみで作成します。標準的な商業用チラシであればこれで問題ありません。しかし、小売店のディスプレイ用の大きくて多孔質の段ボールテストライナーに印刷する場合、標準的な4色プロセス印刷では、 生の紙繊維に不均一に吸収される6。
経験豊富なマーケターでさえ陥りがちな落とし穴は、CMYKハーフトーンのドットを頼りにして、巨大な エンドキャップディスプレイことです。最近、あるクライアントが工場の検査ライトの下で、彼らのプレミアムな赤いロゴがざらざらして色あせ、濁って見えたため、生産現場でパニックに陥るのを目撃しました。 未密封のボード7。私はすぐに印刷機を停止し、標準の版を破棄し、カスタムのスポットカラーフラッドプロトコルを設計しました。 単一の濃密なパントン(PMS)インク8 、そのロゴ専用の版を作成することで、完全に滑らかな顔料のフラッドを塗布し、ざらつきを完全に排除し、30フィート離れたところからでもディスプレイの視覚的なインパクトを瞬時に高めました。
| 初心者によくある間違い | プロフィックス | 小売店舗におけるメリット |
|---|---|---|
| 単色ロゴにCMYKを使用する | 専用のパントン特色プレート9 | 30フィートの視界を最大限に確保 |
| 紙繊維の吸収を無視する | 白い下地プライマープレートを追加する10 | ぼやけた画像を防ぎます |
| デジタル画面の色を信頼する | 物理分光光度計スキャン11 | 厳格なブランドコンプライアンスを保証します |
主要なブランド資産には必ず専用のスポットカラープレートを使用するように指示しています。なぜなら、未加工の段ボール素材に光学ドットブレンドに頼ると、色褪せて安っぽく見えるディスプレイになってしまうからです。.
🛠️ ハーベイのデスク: 大胆な企業ロゴが、小売店の強い照明の下で、ざらざらとした色あせたように見えるのはなぜだろう? 👉 カラーガイドを読んでください ↗ — 安全にダウンロードできます。後で質問があれば、いつでもメッセージを送ってください。
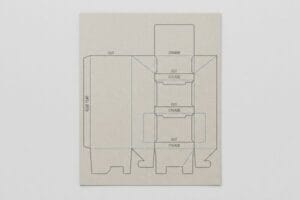
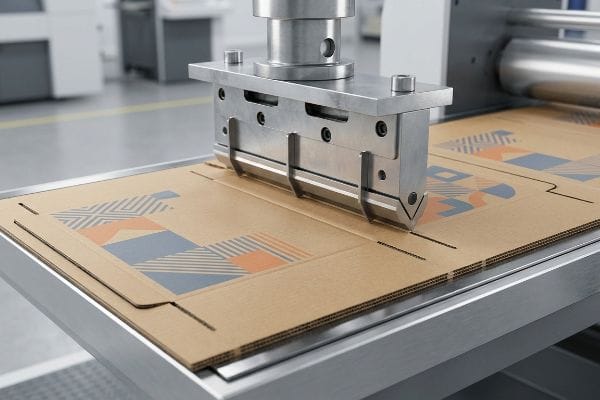
印刷における型抜きとは何ですか?
印刷機上でインクが完全に硬化した後、平らな印刷シートを機能的な三次元構造に加工する必要がある。.
印刷における型抜きとは、特注の鋼製金型を用いて、平らな印刷シートから特定の形状を切り出す機械加工プロセスです。この重厚なプロセスでは、同時に外縁をカットし、表示窓を打ち抜き、厚手の段ボールをきれいに折り曲げるための構造的な折り目を作り出します。.
ほとんどの人は、刃が紙を切るだけだと思っているが、真の工学的な魔法は、目に見えない切り込み線の中で起こっているのだ。.
波型折り目の隠された物理学
グラフィックデザイナーは、型抜きを単純な型抜き作業のように扱い、デジタルファイル上のベクター線が物理的なボード上に自動的に完璧な90度の折り目を作成すると考えがちです。彼らは外側のカットラインにのみ注目し、厚くて多層の段ボール素材の大きな物理的抵抗を無視します。鈍い鋼鉄製の定規を厚い32ECT(エッジクラッシュテスト)ボードに押し込むには、内部のフルートを適切に潰すために、非常に大きな機械的圧力12が必要です。
厚手の段ボールを折り曲げるのは、硬い乾燥スパゲッティの束を曲げようとするようなものだと考えてください。無理に曲げようとすると、パキッと折れてしまいます。ブランドが高級フロアディスプレイを組み立てようとして、工場がダイストライク時の紙の伸びを制御していなかったことに気付くと、この初歩的なミスを何度も目にします。内側のフルートが激しくたわみ、折り目に沿って高級印刷されたトップシートが文字通り割れ、茶色の繊維がむき出しになります。これを解決するために、私はカッティングプレートに取り付けられた特定のポリマーメスマトリックス折り目付けチャネル13を使用します。このポリマーチャネルは、ボードの下で精密な金床として機能し、繊維の伸び方を正確に制御します。これにより、微細な亀裂が防止され、コパッカーはリソクラック14を経験することがなくなり、ディスプレイは重いパレット荷重の下でも構造的完全性を維持します。
| 初心者によくある間違い | プロフィックス | 小売店舗におけるメリット |
|---|---|---|
| 厚板に無理やり折り目をつける | ポリマーマトリックスの折り目チャネル15 | 印刷されたグラフィックのひび割れを防ぎます |
| 紙の伸縮限界を無視する | アンビル圧力の制御16 | 垂直方向の積み重ね強度を維持します |
| 共同包装業者に価格交渉をさせる | 精密機械式プレ折り目加工 | 組み立て時間を20%短縮17 |
適切なマトリックスプロファイリングなしに、厚手の波形構造に切り込みを入れることは決して許しません。なぜなら、折り目にひびが入ると、見た目が悪くなるだけでなく、ユニット全体の物理的な圧縮強度を完全に損なってしまうからです。.
🛠️ ハーベイのデスク: 高級印刷箱が折り目に沿ってひび割れ、店頭に並ぶ前にブランドイメージを損なっていませんか? 👉 ダイラインファイルをお送りください ↗ — 延々と営業電話がかかってくるようなフォームはありません。純粋な価値だけをお届けします。
型抜きプレートの使い方は?
この重機を操作するには、木製の板を印刷された用紙に合わせてスタートボタンを押すだけでは不十分だ。.
型抜きプレートを使用するには、印刷されたアートワークを鋼鉄製の刃に正確に位置合わせするための精密な機械的調整が必要です。印刷されたシートは自動プレス機に送られ、そこで木製の型抜き板が押し下げられます。正確な圧力設定により、下にあるアンビルシリンダーを損傷することなく、段ボール素材を継ぎ目なく切断します。.
しかし、機械が高速で稼働し始め、原材料が移動し始めると、理論を知っているだけでは十分ではない。.
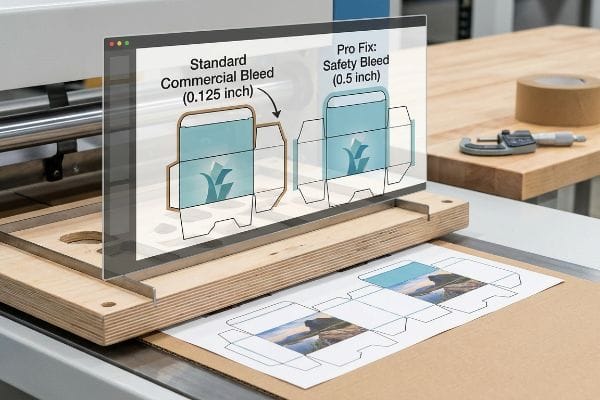
工場現場で標準的なブリードが失敗する理由
グラフィックデザイナーが、大きな段ボール製のディスプレイ用紙に標準的な商業印刷の余白(通常0.125インチまたは3.175mm)を適用するという、一見妥当な思い込みをするのはよくあることです。彼らは、このわずかな余白があれば、自動型抜き機が正確にカットできる十分な安全策になると考えています。これは薄い名刺には有効ですが、厚みのあるリソラミネート構造をマウントしてカットする際に必要となる、より広い機械的許容範囲を完全に無視しています。.
私の工場では、美しくデザインされた小売キャンペーンが、最初の物理的な型抜きテストの段階で即座に失敗するのを日常的に目にします。水性接着剤を使用して湿った印刷済みのトップシートを厚い段ボールベースに接着すると、大きな表面張力18が生じるため、ボード全体がカッティングプレスに入るときに物理的にずれてしまいます。スチールルールダイが当たると、わずかな商業用ブリードが全く不十分で、折り畳まれたディスプレイの前面に醜い茶色の段ボールの端が露出して見えるという、バリが発生します。最近失敗したバッチのマイクロメーターの測定値を取り出して、高価な修正テープは必要なく、単に許容範囲を広げるだけでよいことを証明しました。現在、私はすべてのラミネート加工ジョブで、物理的なカットラインから最低0.5インチ(12.7 mm)のブリードマージン19を厳密に適用しています。アートワークの背景を積極的に拡張することで、ラミネート加工のずれを数学的に吸収し、不良品を推定14%削減し、顧客の無駄な原材料費を数千ドル節約しています。
| 初心者によくある間違い | プロフィックス | 小売店舗におけるメリット |
|---|---|---|
| 0.125インチの市販ブリード20を使用 | 0.5インチの安全ブリードを強制する21 | 段ボールの切りっぱなしの端を隠す |
| ラミネートボードのずれを無視して22 | カットラインを超えてグラフィックを拡張する | 高価な再加工テープを不要にする |
| 型抜き機を責める | プリプレスの計算を早期に修正する | 小売店への出荷遅延を防ぎます |
標準的な商用裁ち落としを使用したプリプレスファイルはすべて拒否します。なぜなら、精密な型抜き加工において微細な公差に頼ることは、高級小売店に未完成で粗雑な端面を出荷する確実な方法だからです。.
🛠️ ハーベイのデスク: 最終アートワークを承認する前に、サプライヤーのリソラミネーションラインの正確な機械的ずれ許容範囲を把握していますか? 👉 ダイラインファイルをお送りください ↗ — 大量生産に予算を浪費する前に、私が計算をストレステストします。
結論
より安価な業者を選ぶこともできますが、不十分な商業用裁ち落としによってカッティングプレスでラミネートが大きくずれると、段ボールの端がむき出しになり、小売店から即座に拒否され、プロジェクトの利益率が完全に失われてしまいます。これは、私のトップ10の小売クライアントが印刷拒否ゼロを保証するために使用している仕様書です。機械的な公差を推測するのはやめて、大量生産が始まる前に致命的な位置ずれエラーを検出するために、私の 無料ダイライン事前監査↗ ください。
「湿度が金属、木材、プラスチック、段ボールに与える影響 – Dehum」、 https://dehum.com/how-humidity-affects-different-materials/。[材料科学または工業用工具に関する権威ある情報源は、吸湿性の木材が反り、炭素鋼の刃が湿度の高い環境で酸化することを検証するだろう]。証拠の役割:技術的検証。情報源の種類:材料科学ハンドブック。裏付け:保管中の工具の劣化。適用範囲に関する注記:特に従来の木製金型に適用される 。↩
「包装・印刷用精密ダイボード切断」、 https://www.ytdiemaker.com/news/die-board-laser-cutting-machine-for-packaging.html。[金型製作に関する技術ガイドでは、木製ボードにスチールルールブレード用の精密なスロットを作成するためにCNCレーザー切断が使用されていることが確認されている]。証拠の役割:プロセス検証。情報源の種類:製造仕様。裏付け:現代の金型製作の精度。範囲に関する注記:製作方法に焦点を当てている 。↩
「ダイカットとレーザーカット:違いは何? – InTouch Labels」、 https://www.intouchlabels.com/label-design/die-cut-vs-laser-cut-whats-the-difference/。[ダイカットの製造仕様では、レーザー精密加工によって、経年劣化した金型に見られるギザギザのエッジが防止され、アートワークの破損を防ぐ方法が詳しく説明されています]。証拠の役割:技術的検証。情報源の種類:製造仕様。サポート:完成品の品質管理。適用範囲に関する注記:高精度小売パッケージに特化 。↩
「湿度と工具温度が最大伸長に及ぼす影響…」、 https://pmc.ncbi.nlm.nih.gov/articles/PMC12194946/。[包装用金型に関する工業工学ガイドでは、金型内の吸湿性材料が湿度によってどのように変形するかを説明しており、ロックタブの構造公差を維持するために気候制御が必要であることを示しています]。証拠の役割:技術的検証。情報源の種類:工業工学マニュアル。サポート:ロックタブの構造的破損の防止。適用範囲に関する注記:主に木製金型に適用されます 。↩
「構造パッケージ設計が廃棄物とコストを削減する方法」、 https://www.bcipkg.com/how-structural-packaging-design-reduces-waste-and-costs/。[パッケージ製造における運用効率調査では、グラフィックプレートとは独立して構造ツールを最適化することで、手作業による組み立てエラーと時間を削減できることを示す定量的データを提供しています]。証拠の役割:定量的検証、情報源の種類:運用効率調査。サポート:手作業による組み立て時間の短縮。範囲に関する注記:時間の短縮効果は製品の複雑さによって異なる場合があります 。↩
「紙および段ボール包装における色の一貫性」、 https://industrialphysics.com/knowledgebase/articles/color-consistency-in-paper-and-corrugated-packaging/。[印刷基材に関する技術マニュアルでは、段ボールテストライナーの高い多孔性がインクのにじみやドットゲインの不均一性を引き起こす仕組みが説明されている]。証拠の役割:技術的検証。情報源の種類:印刷業界ハンドブック。裏付け:多孔質基材がCMYKハーフトーンドットの精度を低下させるという主張。適用範囲に関する注記:特に非コートの多孔質板紙に適用される 。↩
「段ボールとハーフトーン ドットの変形の影響」、 https://www.academia.edu/60461055/Print_uniformity_of_corrugated_board_in_flexo_printing_effects_of_corrugated_board_and_halftone_dot_deformations。[印刷基材に関する権威あるガイドでは、未密封の段ボールの多孔性がインクの毛細管現象を引き起こし、ハーフトーン ドットの光学的な混色を阻害し、知覚される粒状感を増加させる仕組みが説明されています]。証拠の役割:技術的検証。情報源の種類:印刷業界のマニュアル。裏付け:未密封の段ボールの視覚的劣化の原因。適用範囲に関する注記:未密封の段ボール基材に特に適用されます 。↩
「カスタムブランドパッケージにおけるPantoneとCMYKの比較 – EcoEnclose」、 https://www.ecoenclose.com/blog/pantone-vs-cmyk-for-custom-branded-packaging?srsltid=AfmBOorMaLKwXl9r6LjVzy4j_1uq90453m9bhFeT7VNQzxaVI0ITg9nA。[Pantone Matching System (PMS) の技術標準では、スポットカラーはCMYKプロセス印刷の「ドット」のような外観を避ける、均一でしっかりとした顔料層を提供するとされています]。証拠の役割:技術比較。情報源の種類:カラーマネジメント標準。裏付け:ブランドの一貫性におけるスポットカラーの有効性。範囲に関する注記:ハーフトーンのドットに対するソリッドインクのカバー率に焦点を当てています 。↩
「パッケージングにおけるPMSとCMYK:どちらが優れているか? – PAX Solutions」、 https://pax.solutions/corrugated-packaging/pms-vs-cmyk-for-packaging/。[権威ある印刷ガイドでは、スポットカラーがCMYKミックスよりも高い彩度と一貫性を提供し、視覚的なインパクトと遠距離からの視認性を向上させる仕組みが説明されています]。証拠の役割:技術的検証、情報源の種類:業界標準、裏付け:視認性を高めるためのスポットカラーの使用。適用範囲に関する注記:特に高コントラストの小売環境に適用されます 。↩
「段ボール製造 | Fefco」、 https://www.fefco.org/lca/dscription-of-production-system/corrugated-board-production。[印刷技術マニュアルでは、白い下地版が段ボール基材の自然な茶色を遮断し、インクが繊維に吸収されるのを防ぎ、色の純度を維持する方法が詳しく説明されています]。証拠の役割:技術的説明、情報源の種類:印刷マニュアル、サポート:グラフィックの濁り防止。適用範囲に関する注記:クラフトボードなどの非白色基材に特有 。↩
「医薬品印刷におけるカラー分光光度計 – Platinum Press」、 https://platinumpress.com/color-spectrophotometers-in-pharmaceutical-printing/。[色彩科学の参考文献では、分光光度計がスクリーンキャリブレーションに関係なく、印刷色がブランド仕様に合致することを保証する客観的な数値データを提供する仕組みが説明されています]。証拠の役割:技術的検証、情報源の種類:科学機器ガイド、サポート:スキャンによるブランドコンプライアンス。範囲に関する注記:デルタEの変動に焦点を当てています 。↩
「段ボール箱の圧縮強度の推定…」、 https://pmc.ncbi.nlm.nih.gov/articles/PMC8467740/。[包装工学マニュアルまたは材料科学ガイドでは、32ECTボードの特定の圧縮強度とフルートを潰すのに必要な力を検証します。証拠の役割:技術的検証。情報源の種類:業界標準。裏付け:32ECTボードの物理的抵抗と圧力に関する主張。範囲に関する注記:圧力要件は、スチールルールの幅によって異なる場合があります。] ↩
「ダイカット折り目マトリックス – YouTube」、 https://www.youtube.com/watch?v=9ucluzReN6U。[権威ある包装工学の情報源では、折り目加工中の段ボールフルートの圧縮とライナーの伸びを制御するために、雌型マトリックスチャネルを使用することが説明されています]。証拠の役割:技術検証。情報源の種類:エンジニアリングマニュアル。裏付け:板紙の破損を防ぐための特殊工具の使用。適用範囲に関する注記:特に高耐久性段ボールに適用されます 。↩
「C&Tがアンビルクリースマトリックスを追加 – ThePackagingPortal.com」、 https://www.thepackagingportal.com/industry-news/ct-adds-anvil-crease-matrix/。[印刷工程の技術ガイドでは、リソクラックを折り畳み時の印刷面の亀裂と定義し、マトリックスツールがこの欠陥をどのように解消するかを説明しています]。証拠の役割:技術検証、情報源の種類:業界標準。裏付け:マトリックスクリースがトップシートの美的完全性を維持するという主張。適用範囲に関する注記:高級リソラミネート板紙に関する 。↩
"[PDF] 折り目加工と折り畳み – BioResources", https://bioresources.cnr.ncsu.edu/wp-content/uploads/2019/01/2017.1.69.pdf。[折り目加工材料の技術仕様では、ポリマーマトリックスチャネルが表面繊維への応力を軽減し、厚手の基材上のインクのひび割れを防ぐかどうかを検証します]。証拠の役割:技術検証。情報源の種類:エンジニアリングマニュアル。サポート:グラフィックのひび割れ防止。適用範囲に関する注記:特に厚手のボードに適用されます 。↩
「段ボールの側面圧力強度と相関関係の分析…」、 https://www.llypack.com/blog/analyze-the-side-pressure-strength-and-correlation-of-corrugated-cardboard-54730.html。[ダイカットの業界標準では、アンビル圧力、ボード圧縮、および結果として生じる垂直構造の完全性の関係が説明されます]。証拠の役割:技術的検証。情報源の種類:印刷業界ガイド。サポート:積み重ね強度の維持。範囲に関する注記:紙の伸縮限界の管理に関連します 。↩
「自動折り目付け機が包装生産をどのように改善するか」、 https://www.dayuanmach.com/blog/how-automatic-creasing-machines-improve-packaging-production。[包装組立に関する運用データまたはケーススタディは、標準的な方法と比較して精密な事前折り目付けによって得られる具体的な時間短縮に関する実証的証拠を提供するでしょう]。証拠の役割:実証的検証。情報源の種類:業界ケーススタディ。サポート:組立効率。範囲に関する注記:共同包装業者のパフォーマンスに関するものです 。↩
「大気中の水分による濡れ性と接着性の向上… – PMC」、 https://pmc.ncbi.nlm.nih.gov/articles/PMC7998882/。[包装用接着剤に関する技術マニュアルでは、水性接着剤の水分含有量が段ボール材料の基材膨張と位置ずれを引き起こす仕組みが説明されている]。証拠の役割:技術的説明、情報源の種類:エンジニアリングマニュアル。裏付け:型抜き時のボードずれの原因。適用範囲に関する注記:多孔質基材上の水性接着剤に限定 。↩
「パッケージデザインにおけるブリードの重要性を理解する」、 https://epacflexibles.com/understanding-the-importance-of-bleed-in-packaging-design/?srsltid=AfmBOoooldAUyrfIvg6ObiA8dEgZINbEnr9u3BpA4a8UPmks4tWhXaIq 。[大型段ボールディスプレイの業界印刷生産規格では、ラミネート加工と型抜きにおける機械的公差を補正するために必要なブリードが規定されています]。証拠の役割:技術仕様、情報源の種類:業界標準。サポート:ラミネート加工ジョブの正しいブリード幅。範囲に関する注記:公差は印刷機の精度によって異なる場合があります 。↩
「フルブリード印刷の説明 – Mixam」、 https://mixam.com/support/bleed。[プリプレス技術マニュアルでは、0.125インチが商業印刷プロジェクトの業界標準最小ブリードであることが確認できます]。証拠の役割:事実確認、情報源の種類:技術マニュアル。サポート:標準的な商業ブリードの指標。適用範囲に関する注記:標準的な商業印刷に適用され、業界要件とは異なります 。↩
"[PDF] 機械の操作箇所における安全対策 – オレゴン州労働安全衛生局", https://osha.oregon.gov/oshapubs/2980.pdf。[大規模ダイカットのエンジニアリングガイドラインでは、工場現場での機械的位置合わせ公差を考慮して0.5インチのマージンを使用することが妥当であるとされています]。証拠の役割:技術仕様書、情報源の種類:エンジニアリングガイドライン。サポート:産業安全ブリード基準。適用範囲に関する注記:重機ダイカットに特有 。↩
「型抜き加工における型抜き位置ずれ問題のトラブルシューティング」、 https://bmcpack.com/blogs/news/troubleshooting-die-cut-misalignment-issues-in-professional-die-cut-die-cutting-operations。[製造ドキュメントには、ラミネート加工および型抜き加工中の基材の動きの物理的原因が説明されています]。証拠の役割:技術的説明、情報源の種類:製造教科書。サポート:位置ずれ現象。範囲に関する注記:基材の不安定性に焦点を当てています 。↩